September, 2015
Unlike many people I usually don’t fly multirotors just for “fun”. Sure, to some extent flying them is fun, but it’s counterbalanced by the small and always present possibility they can just fall out of the sky and destroying big bucks. (Not that it’s ever happened to me….) For me multirotors are more of a magical, unique tool, for some pretty specific jobs, usually along lines of imaging.
Along those lines, I’ve always been interested in the use of multirotors in the area of search and rescue. In fact, some of my own multicopter designs were based upon the ability to take deep into the field and deploy easily.
Anyone who has ever looked at the video transmission direct from a multicopter (FPV) knows that it’s pretty crap for looking for things on the ground. But images from onboard recording HD cameras are a much different matter. With the right camera you can actually make out very small objects on the ground….like….oh, I don’t know….maybe bones?
I’ve performed countless tests of different imaging setups on my various multicopters. From that I’ve sort of developed a general sense of how high I can fly and still make out small objects. But knowing that you can probably see a certain sized rock and extrapolating that to guess that you could visualize a tibia is a whole different thing. And these flight altitudes may be very different than those typically used for mapping purposes.
So I got to wondering, how I could test multicopter viability for spotting human remains? And how high could one fly and still pick out non-natural things in a natural environment? Higher is better in the sense that each image covers more ground and reduces flight time.
I pondered it a bit and decided that to do the test properly I needed a skeleton or pieces thereof. Where to get one of those, my own currently in use and unavailable? Turns out there are folks on eBay selling full sized plastic skeletons for a little over $100. While that was surprisingly cheap (and tempting on several levels!) it was more than I wanted to spend to satisfy this bit of curiosity. That, and I already have enough of a challenge explaining my weird Amazon purchases to Jeri. So a reluctant pass on eBay as a skeletal source.
With a bit more Googling I managed to find a free download of a pdf file for a full sized human skeleton drawing! Apparently everything in the world is on the Internet. So I grabbed it, printed out the many sheets and glued them on to some foam board. A few hours of cutting later I had a collection of full scale foam board “bones”.
I didn’t do the entire skeleton. While I could spew out some sort of bullshit about wanting to simulate a partial skeletal debris field, blah, blah, blah….in truth I just got tired of cutting the damned foam board. But I made sure I had a representative collection ranging from small bones, like metatarsals and vertebrae, up to a 2D skull and a honking big femur (BTW, the skeleton was supposedly sized to be that of a 6′ 1″ individual, which I thought rather large. But I didn’t want to go to the trouble of resizing down).
I had two cameras I wanted to test, carried by my very reliable tricopter, a GoPro and a Canon SX230 HS. My plan was to shoot still images, once every two seconds at altitudes from 50 feet up to 450 feet, at 50 foot increments. Sure, all this resolution stuff can be calculated but I wanted real world results that include mediocre cameras and a vibrating platform. Oh yeah, and there’s also that “Math is hard” thing.
Seeing as how I was planning on scattering an array of what looked like human bones I decided it might be best to do this test where others weren’t. So I headed out to where all good serial killers go to dump their leftovers, the Southern California desert!
I found a remote spot adjacent to a dirt road to spread out my stuff. I needed to be close to a dirt road so I could use the road as a sighting aid to ensure I overflew the test site correctly each time. In an FPV camera, it’s often hard to pick out specific sites on the ground in a place as nondescript as desert, but a road is a very visible landmark.
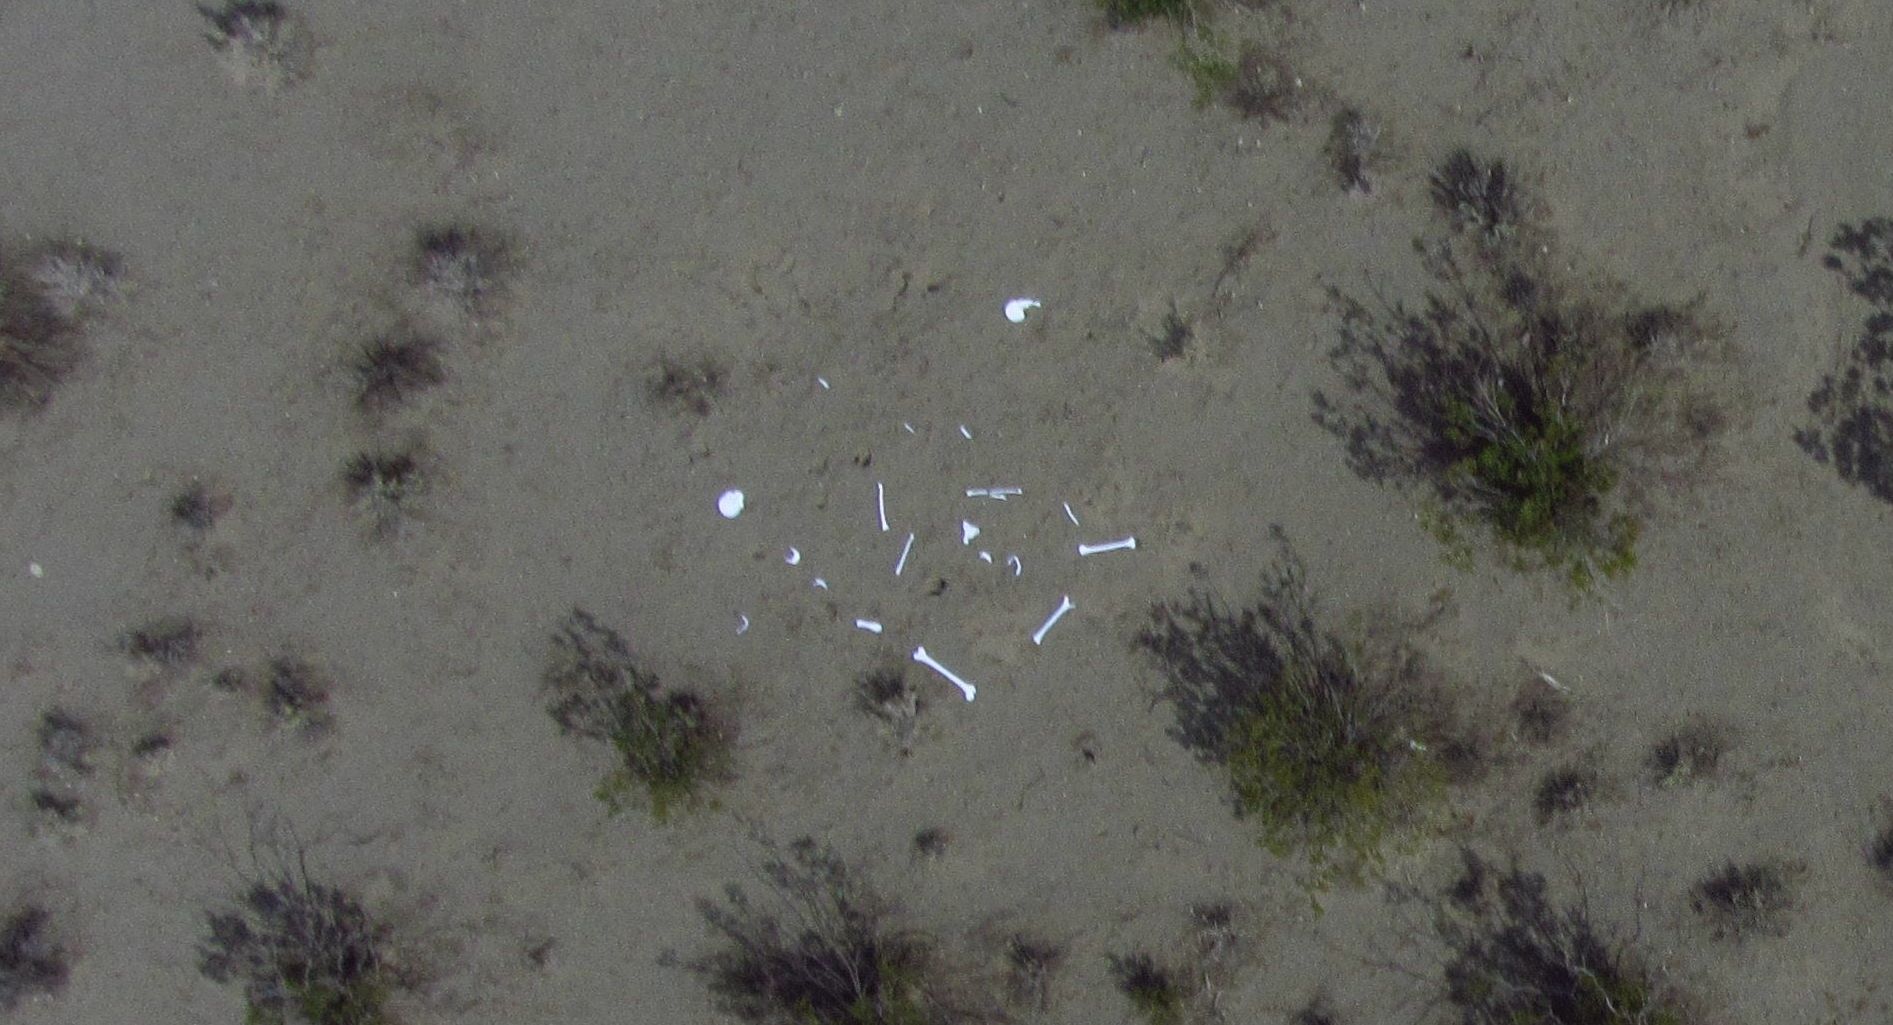
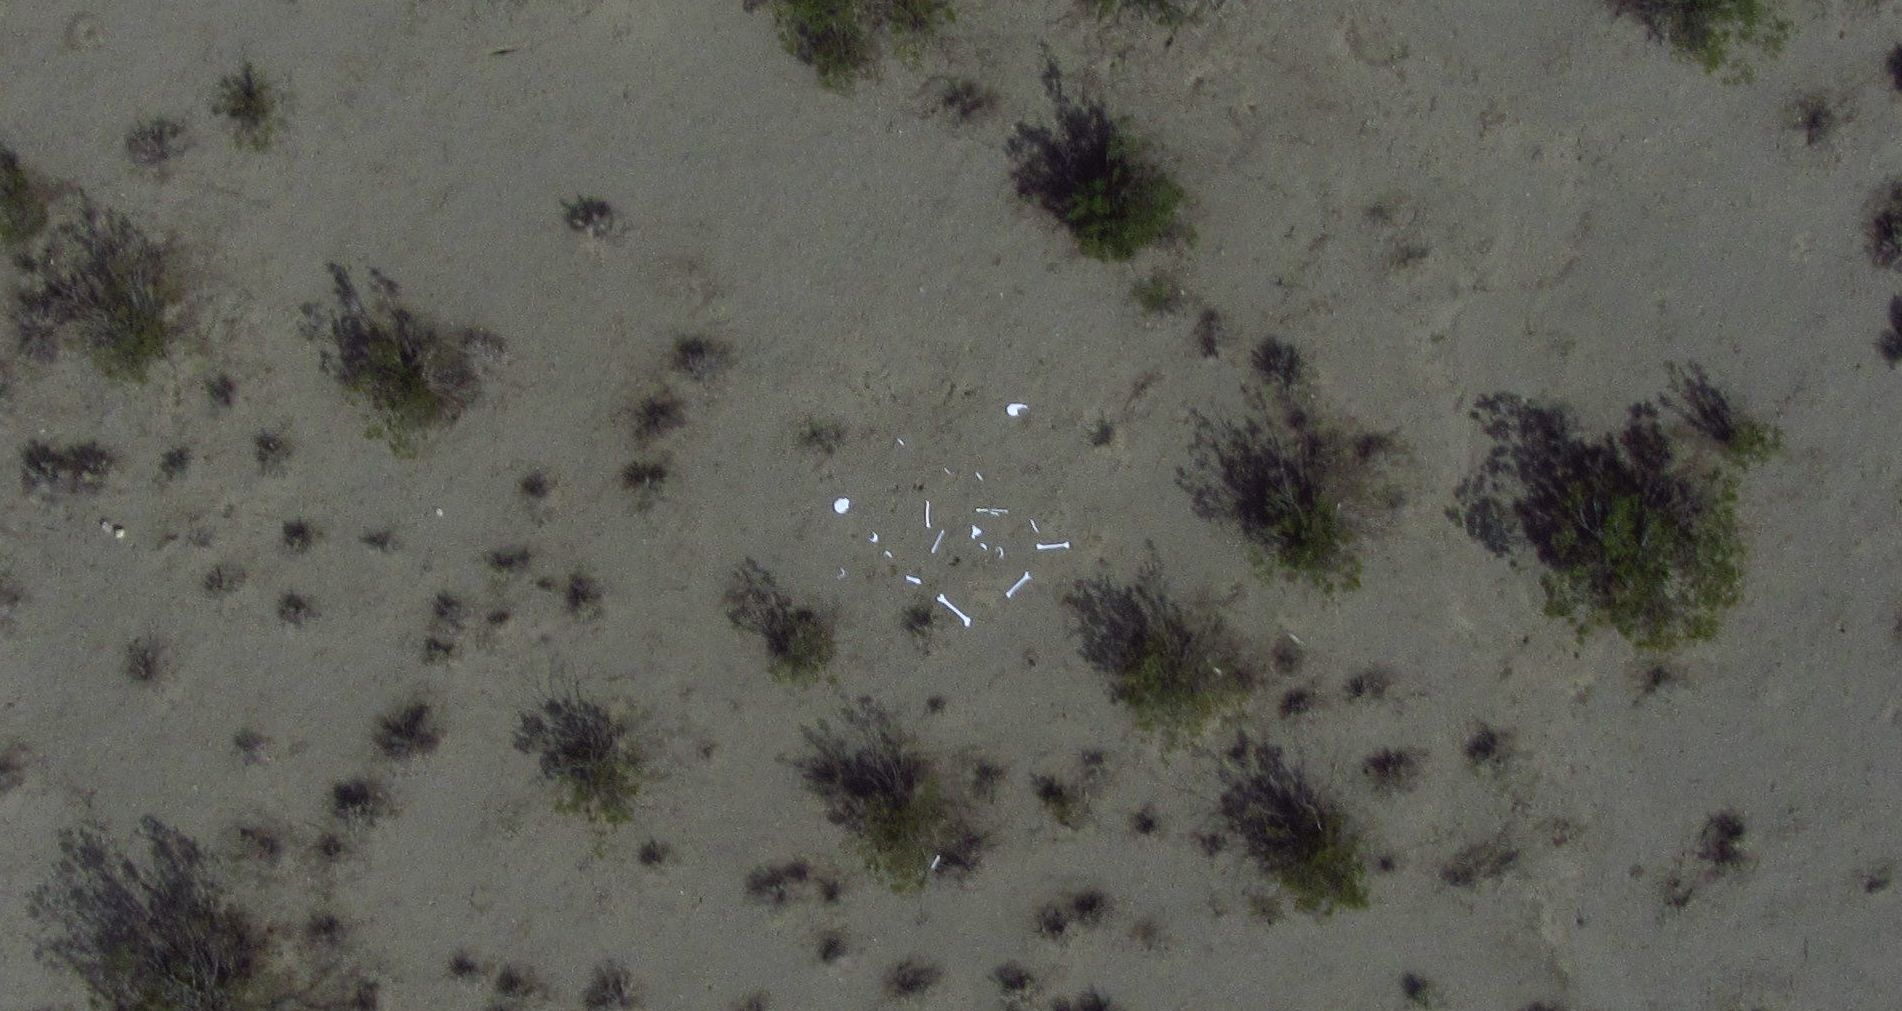
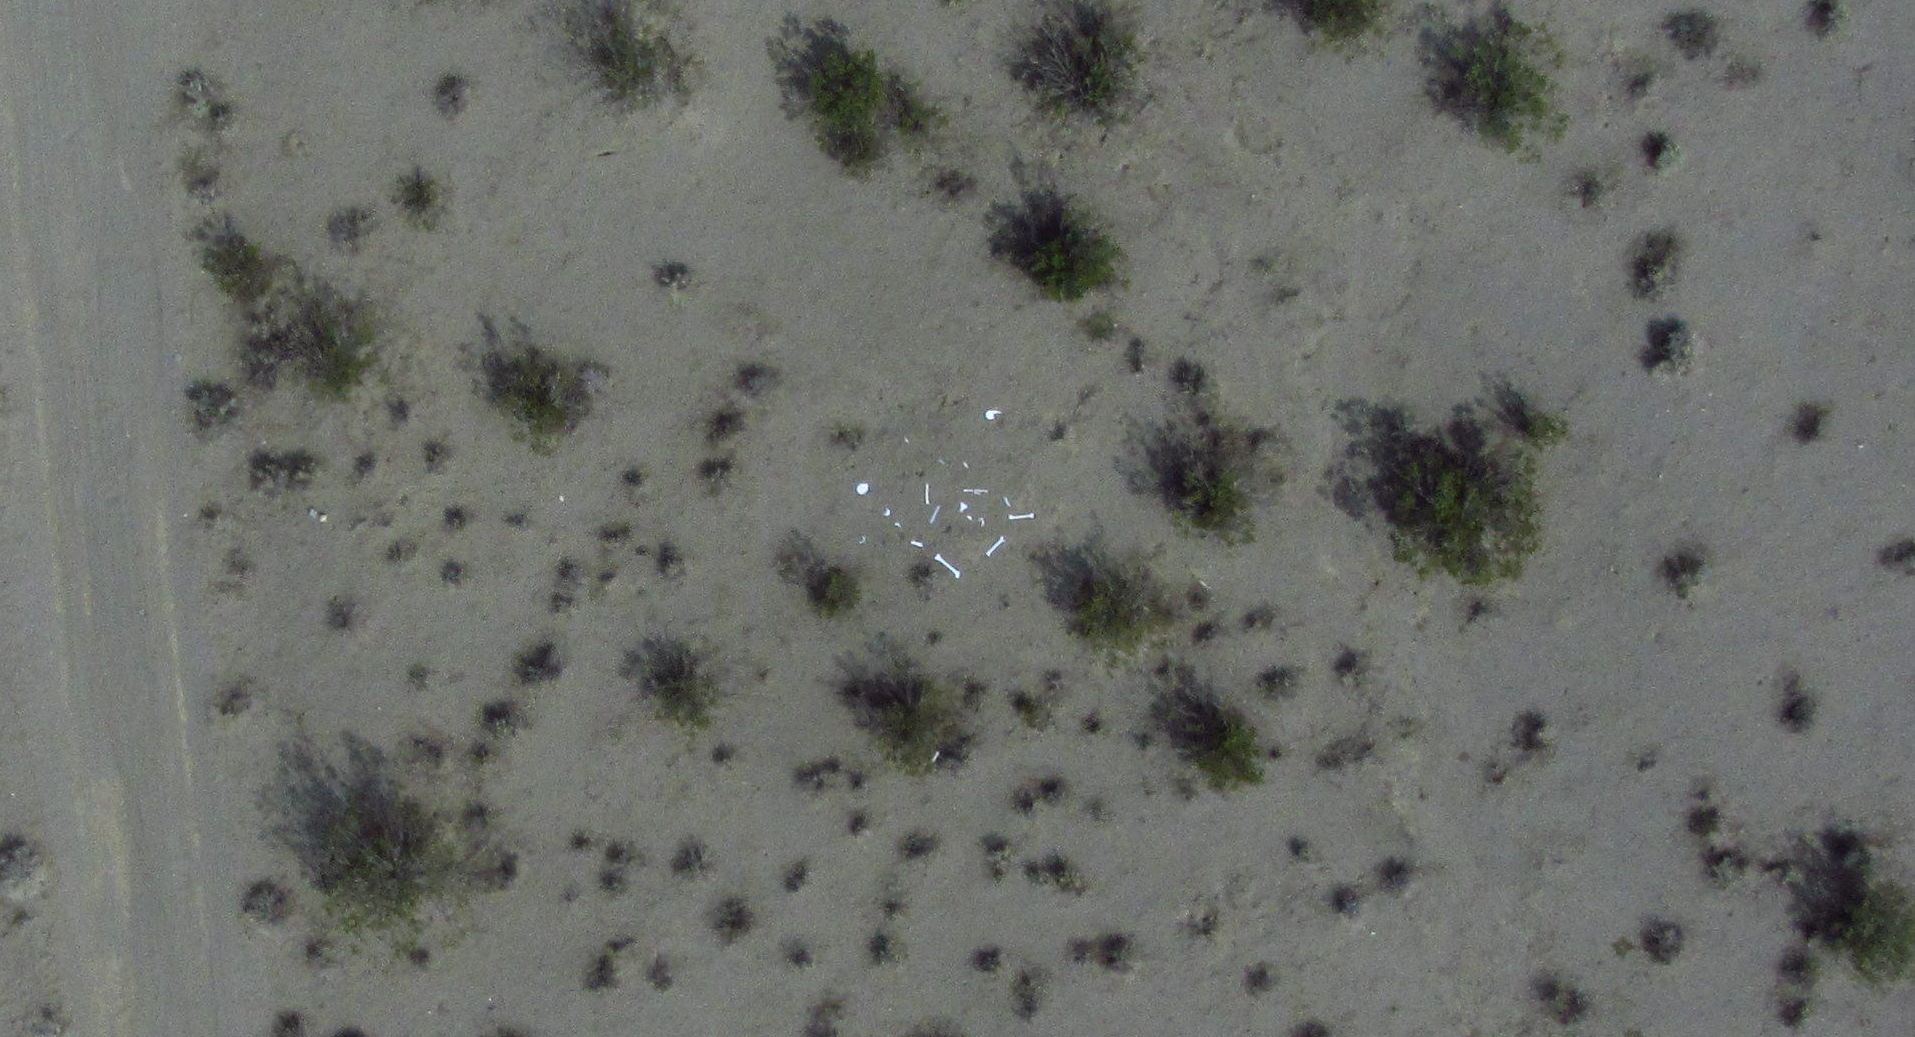
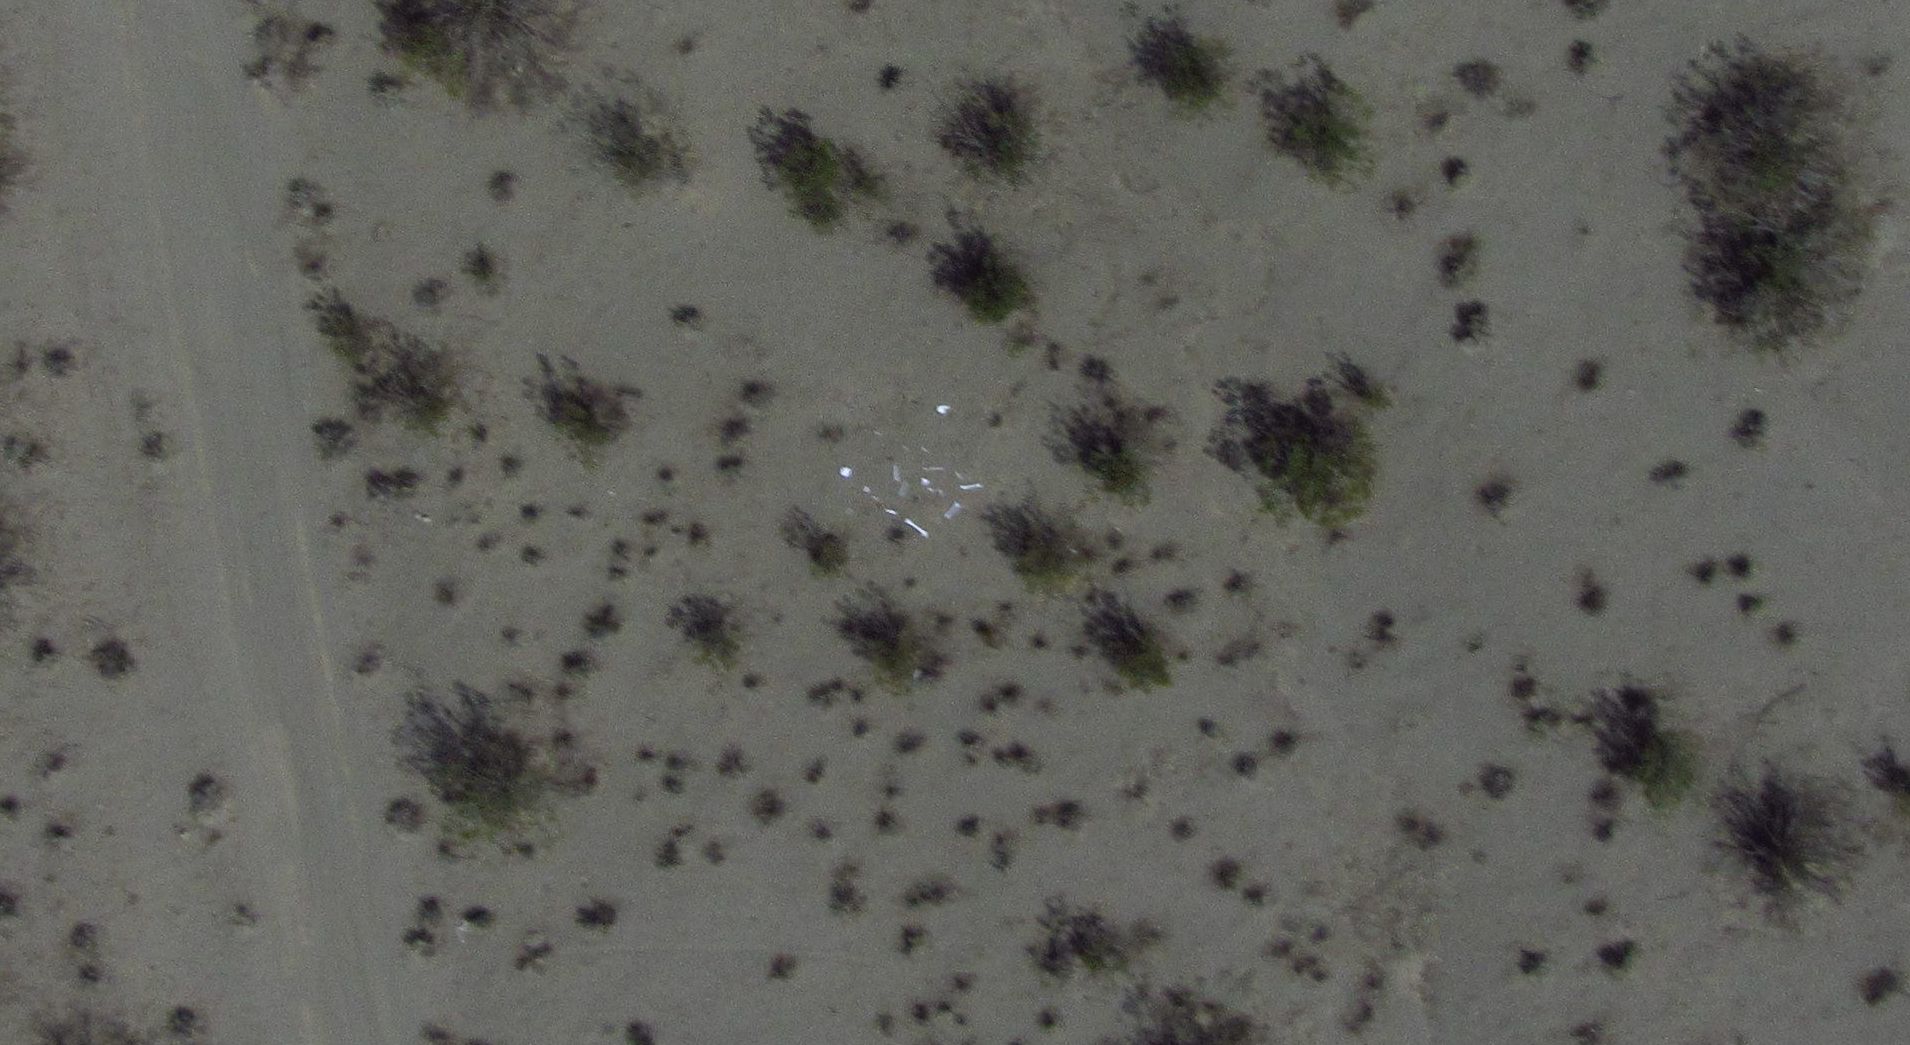
This particular location was flat, with a scattering of brush, up to larger Greasewood plants. There was no particular method to my spreading of the foam board bones, I just tossed them out. The time of day was just before Noon with a very thin Cirrus cloud layer which slightly diffused the Sun. So it wasn’t especially flat lighting but not strong shadowing either.
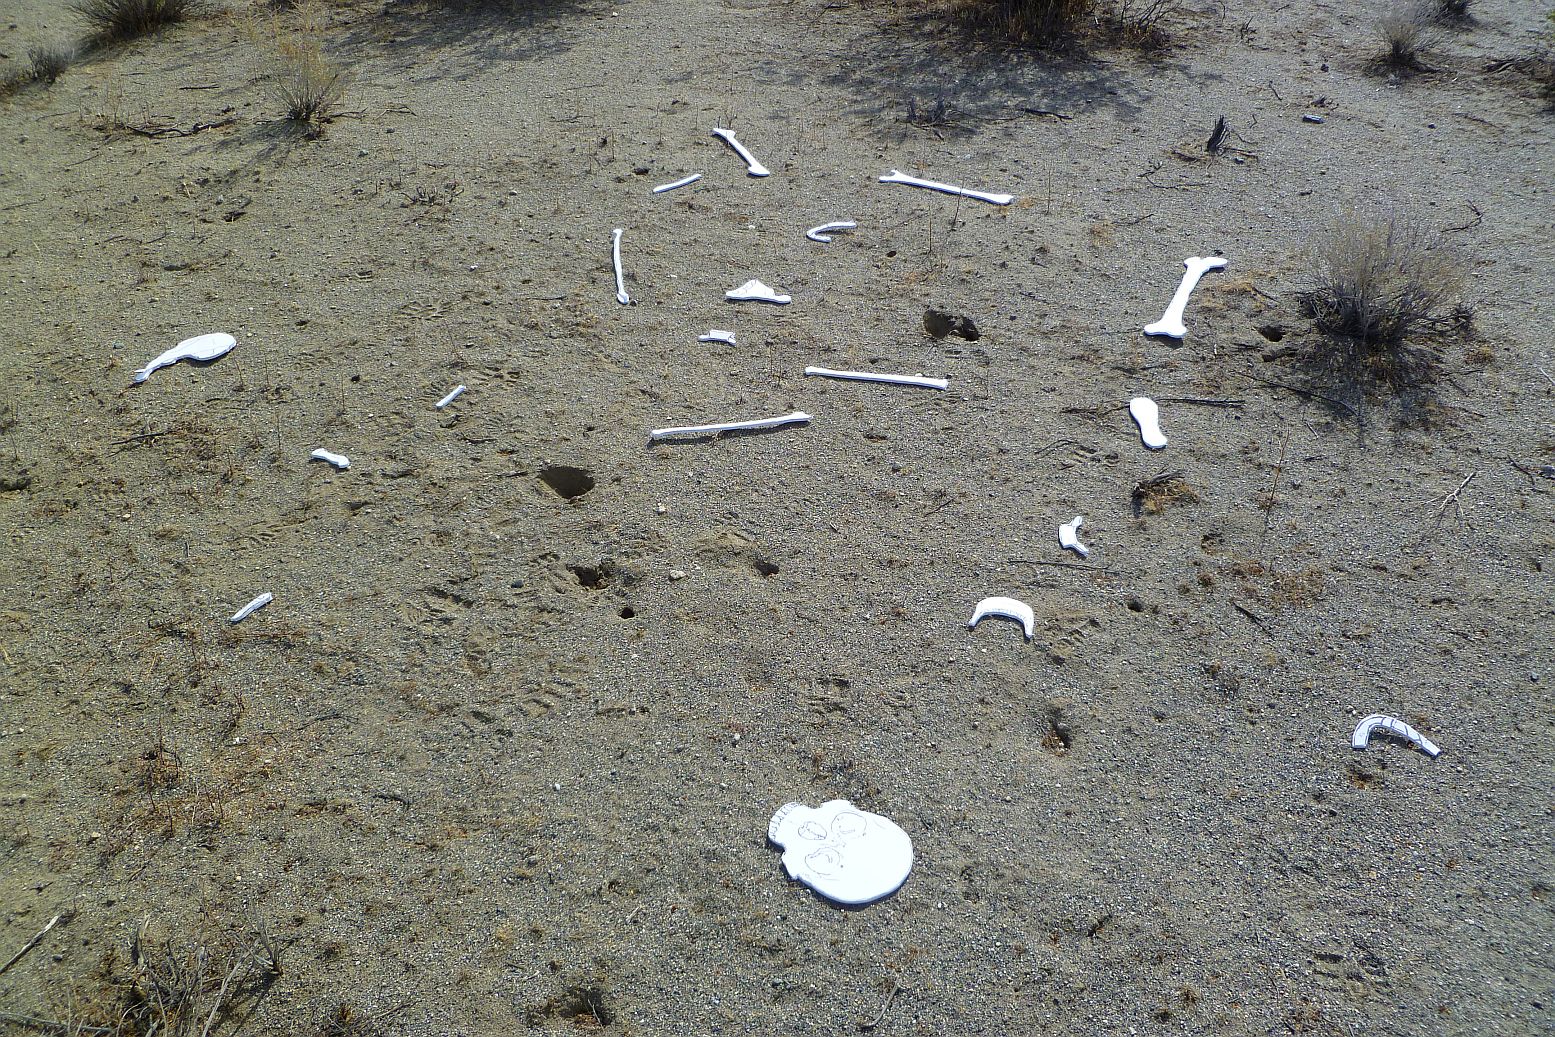
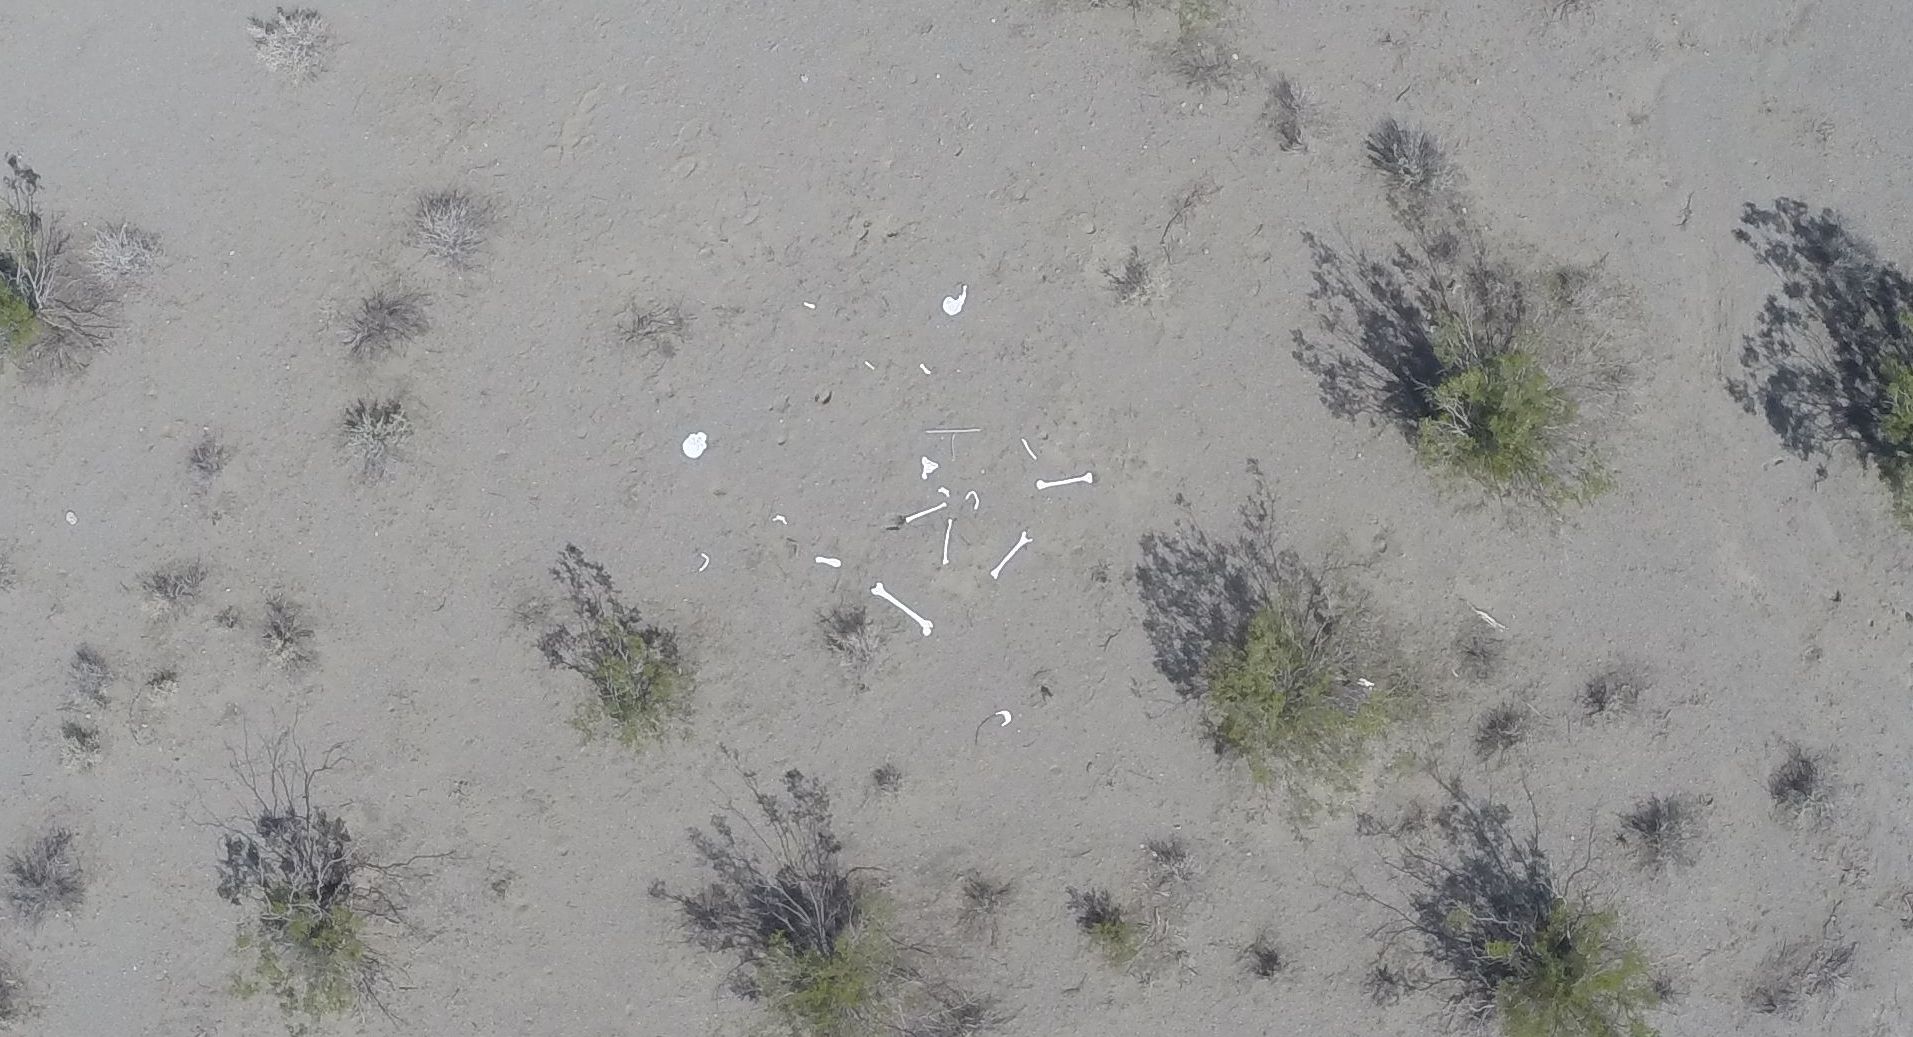
A view of my scattered test bone field using full sized pieces of foam board.
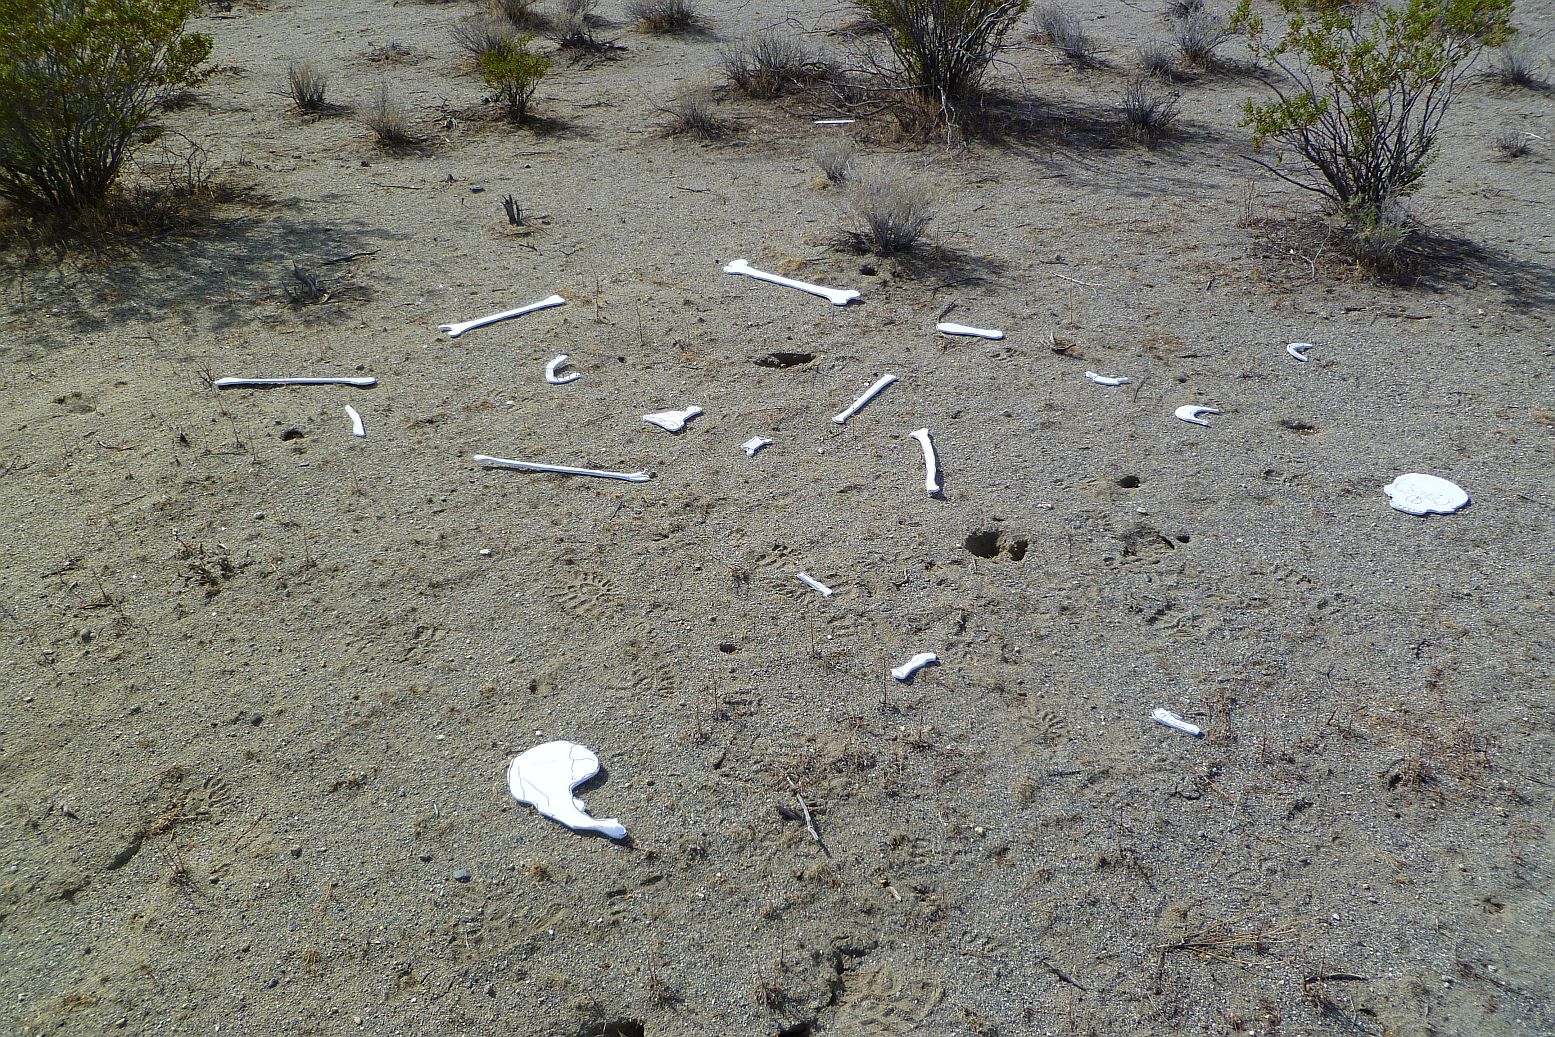
Another view of my test bone field.
My tricopter uses a Pixhawk flight controller, so when I launched it from my bone test site it registered that location as its home point. That way I could see its altitude above and its distance from the test site in my goggles via the MinimOSD onscreen data display.

My Tri^3 tricopter ready for takeoff sporting a GoPro Hero 3+.
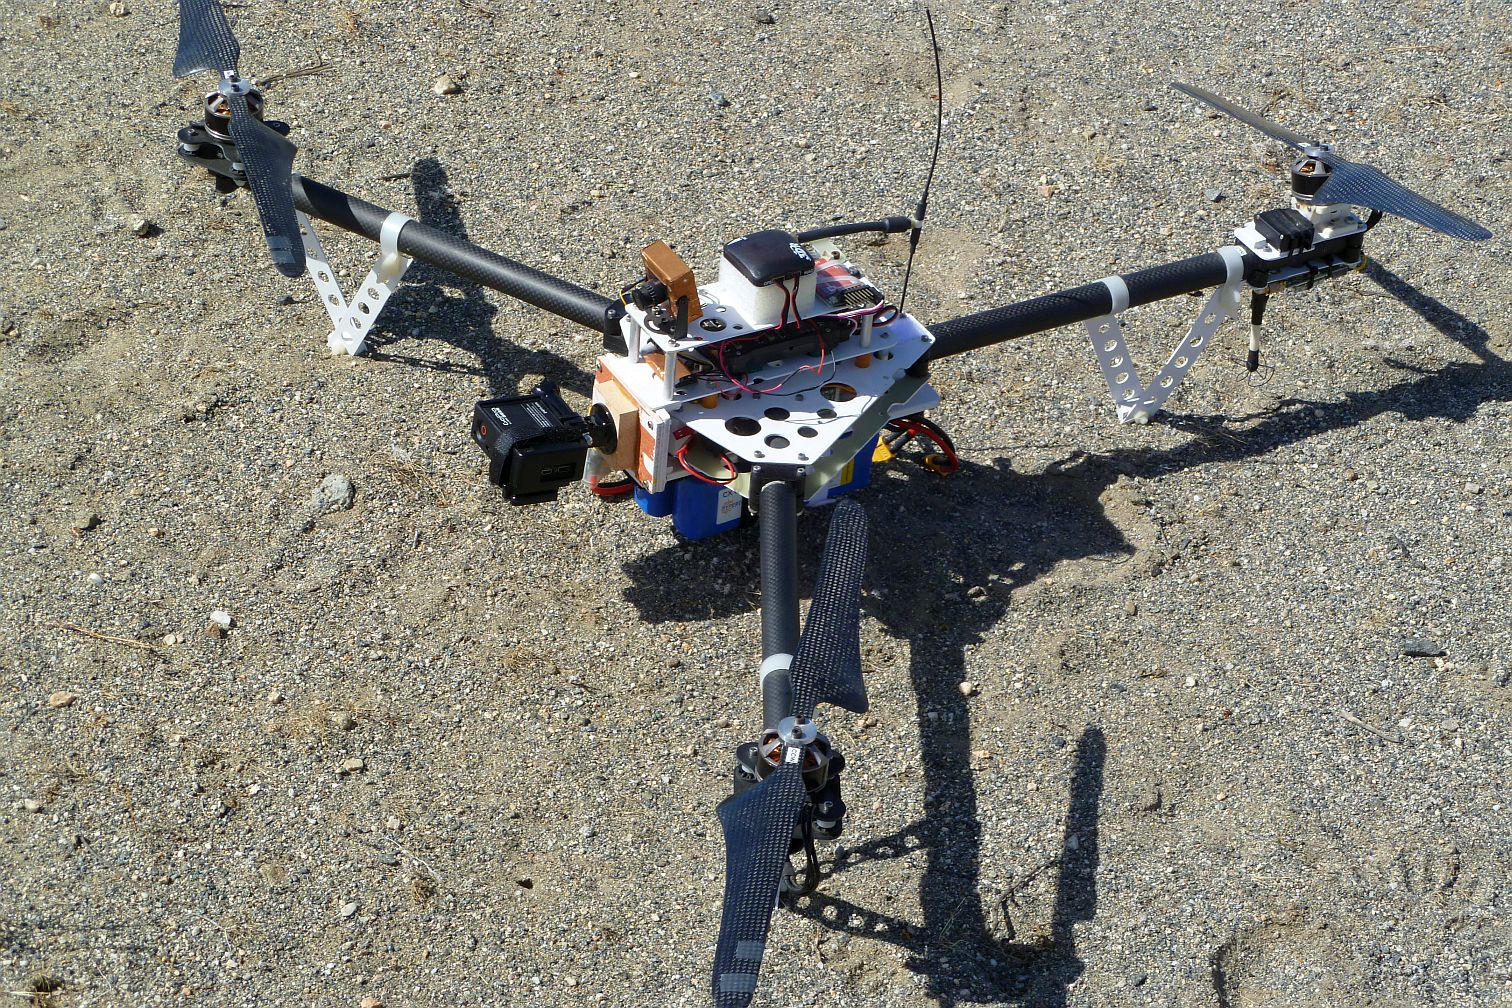
A closeup of my Tri^3 tricopter showing the simple GoPro mount. Nothing fancy here.
For each camera I made a total of nine level passes, starting at 50 feet above the ground and finishing at 450 feet. Climbs to the next test altitude were made at the end of each run and the test site was overflown at a speed of between 5 and 7 mph.
Before I get into the images a few words about the two cameras might be in order. The Canon SX230 HS runs the CDHK firmware and can take an image every two seconds at its most rapid rate. Shutter speed is automatic, but typically runs around 1/2000 of a second. (My large propped tricopter generates a lot of funky vibration so a fast shutter is important). I run the Canon at its widest angle view, which is about a 28 mm in 35 mm camera equivalency. The images are shot at the 12 megapixel setting. This model camera has built in GPS and can tag the images if desired. I’ve found it to be a very reliable camera and can be had for around $100 on eBay. I like that it’s fairly cheap so I’m not risking expensive equipment in the event of a crash. The camera’s biggest negative is that it’s heavy, weighing in at 236 grams, including its tricopter mount.
My GoPro is a standard Hero 3+ Black. For stills I ran it at 12 megapixels and its FOV set to Ultra Wide. Like the Canon, I set it to image every two seconds using the timelapse setting. Since I’ve only used the GoPro for video I had Protune option turned on. Protune produces a rather flat, slightly washed out video that’s ready for post-processing and made vibrant. I didn’t realize the Protune apparently carries over to stills on my camera, so they ended up a bit washed out. But with post-processing, they match the Canon in image contrast and color. The GoPro, in its standard frame mount and adapter for the tricopter, weighs in at 143 grams.
Analysis
After completing the flights I reviewed the images and was rather surprised at how well I could see the bones in both sets of images. For some reason the bones really pop out in the Canon set, but visually at the time they didn’t appear THAT prominent.
To begin my comparison I selected a single picture from each altitude run that had the test site roughly centered and wasn’t obviously blurred. I then zoomed in on the bone field itself until I was viewing it at a 1:1 ratio and cropped out just what was visible on my desktop screen. I thus ended up with nine images for each camera that would each fit on my screen with no zooming or shrinking.
Looking at the image series for each camera I picked the one taken as high an altitude as possible, but still obvious that something was there and might be interesting. In the case of the Canon, I thought the image taken at 400 feet was still very useable for target identification. For the GoPro, with its much wider angle lens, I felt the maximum altitude was considerably lower, maybe only 200 feet. I will concede there’s a lot of subjectivity to this, but I tried to be conservative.
I was pleased to discover that I could see the bones even at my maximum test altitude of 450 feet, but in the case of the GoPro you had to know where to look. They didn’t jump out.
The following are the series of nine images for each camera. Note that beyond cropping, I’ve done NO post-processing on any of them. They are just as they came from the camera. Doing just a bit of post-processing greatly enhances things. And with the GoPro I’d certainly take it off the Protune setting were I to do it again. Dumb.
These cropped images look at just the resolution and clarity of the bone area. I thought it might also be illustrative to include the full frames from which the two “winning” cropped images were taken from. So for the Canon I’ve included the full frame taken at 400 feet, and also the GoPro full frame taken at 200 feet.
Canon SX230 HS Images:
Canon SX230 HS camera overflying my bone test site at 50 feet.
Canon SX230 HS camera overflying my bone test site at 100 feet.
Canon SX230 HS camera overflying my bone test site at 150 feet.
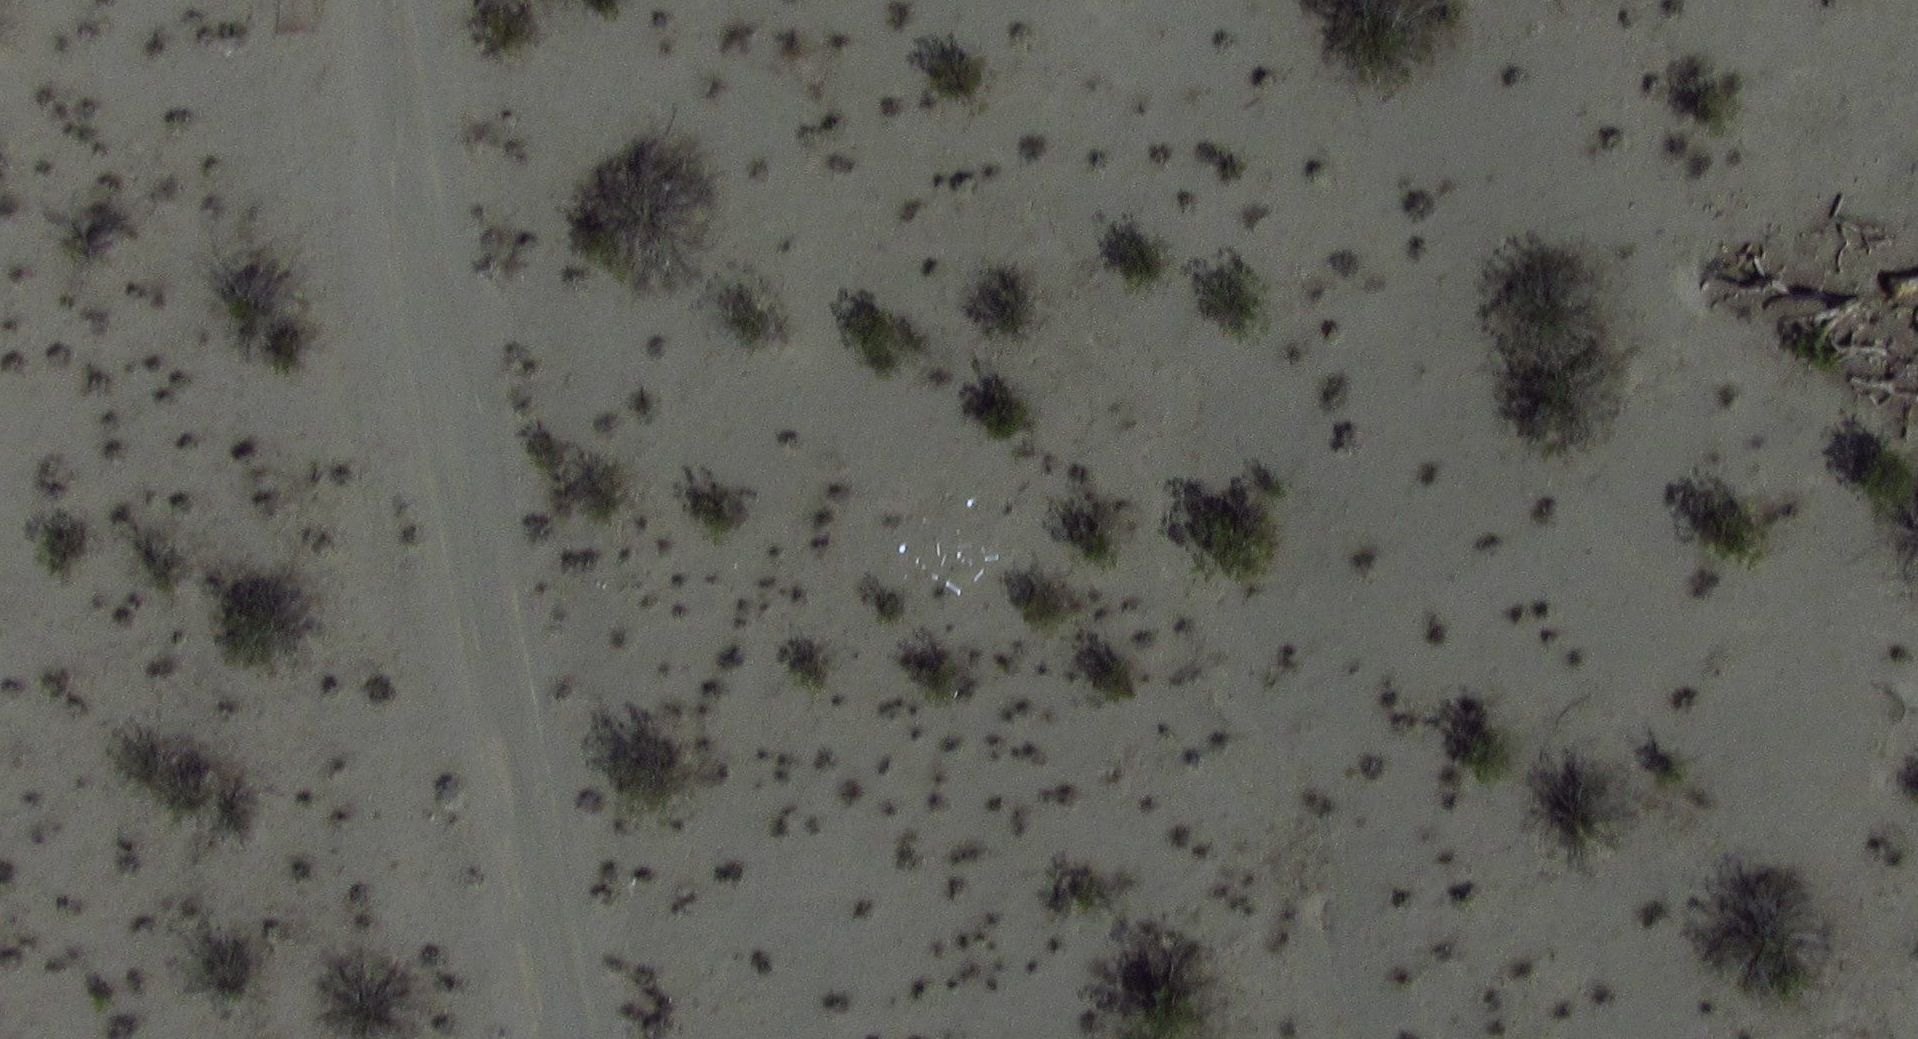
Canon SX230 HS camera overflying my bone test site at 200 feet.
Canon SX230 HS camera overflying my bone test site at 250 feet.

Canon SX230 HS camera overflying my bone test site at 300 feet.
Canon SX230 HS camera overflying my bone test site at 350 feet.
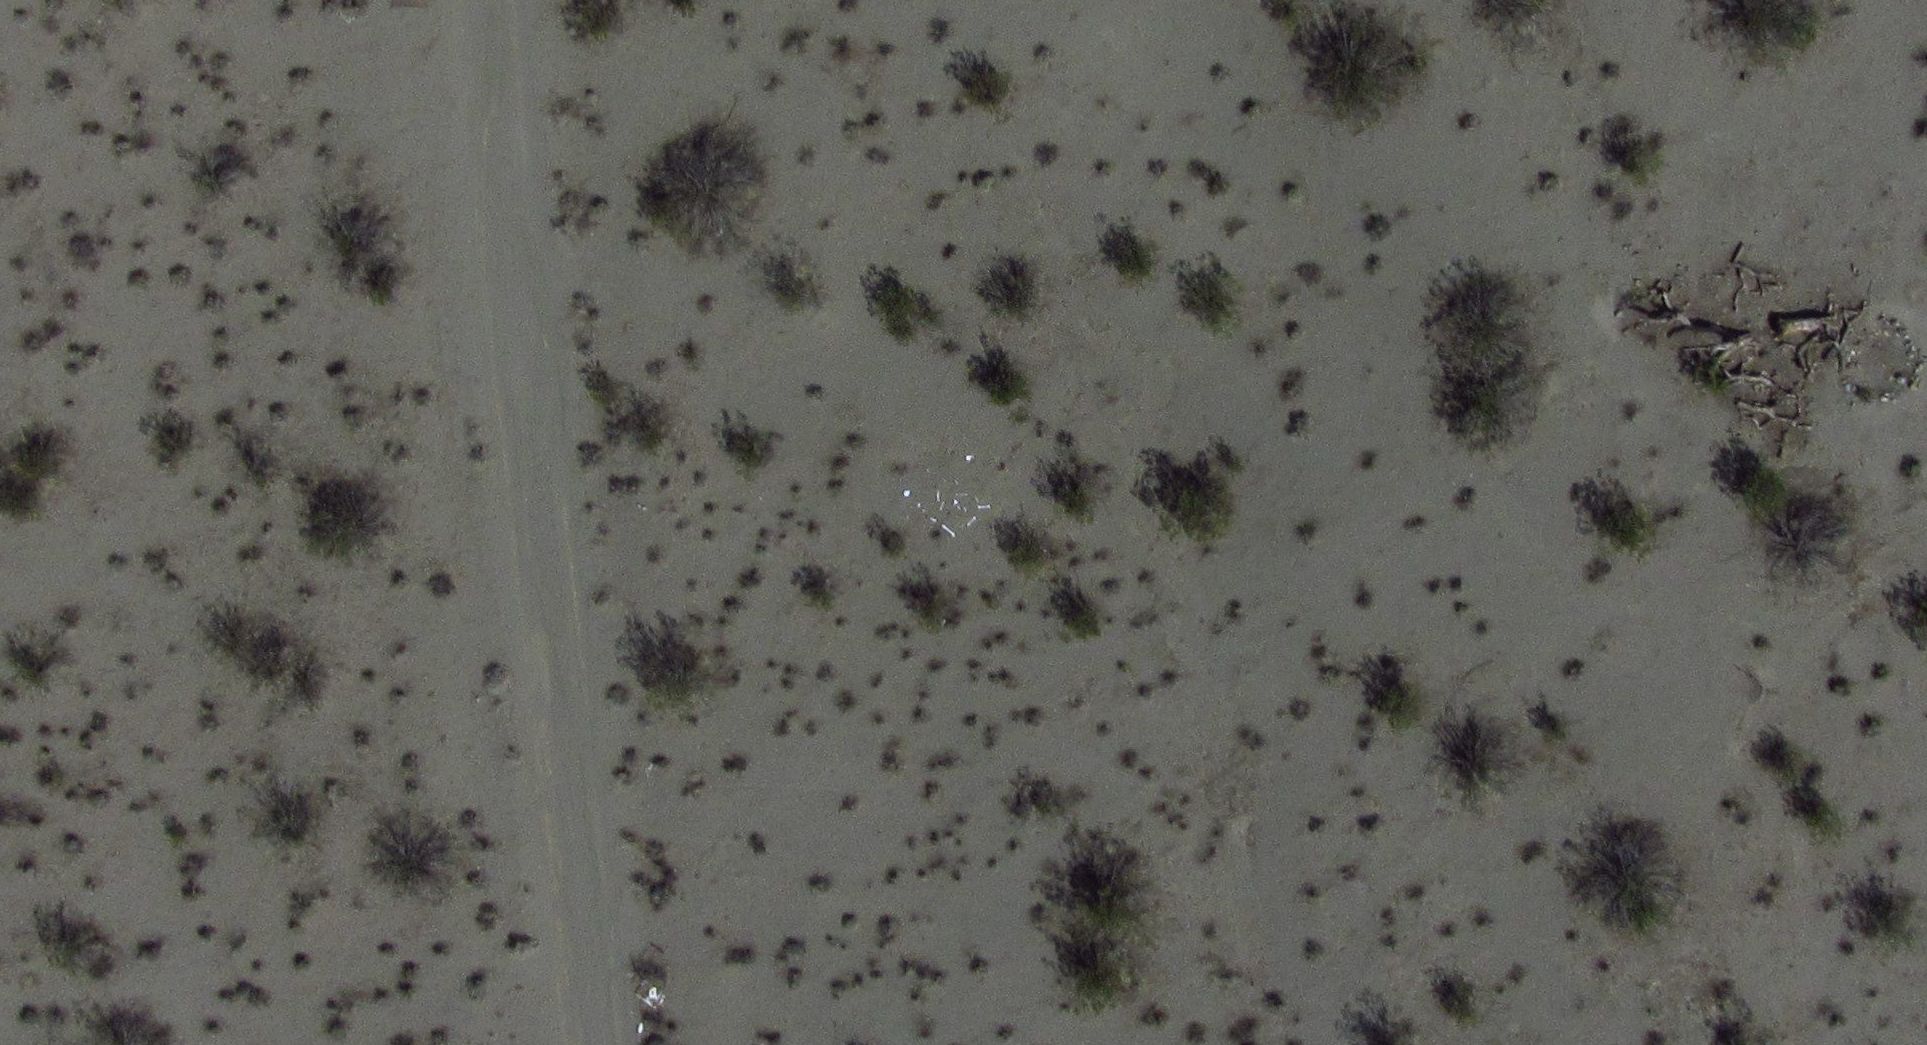
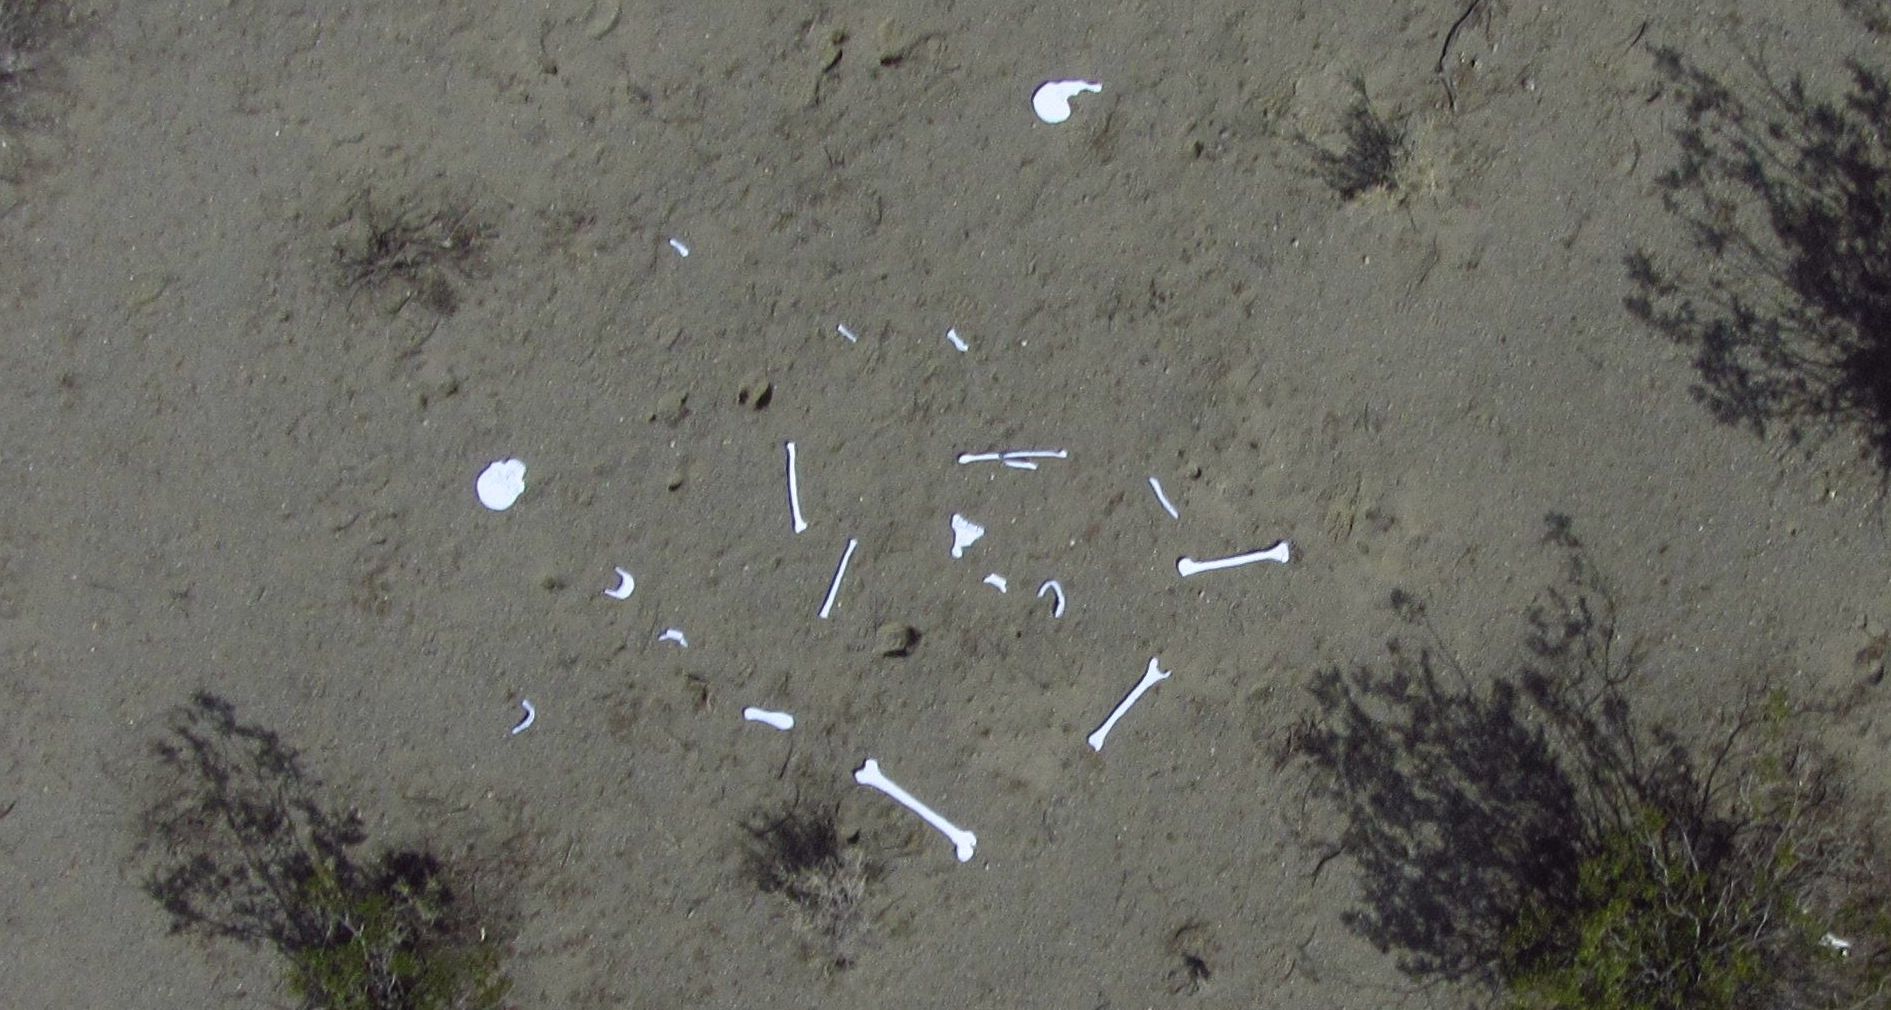
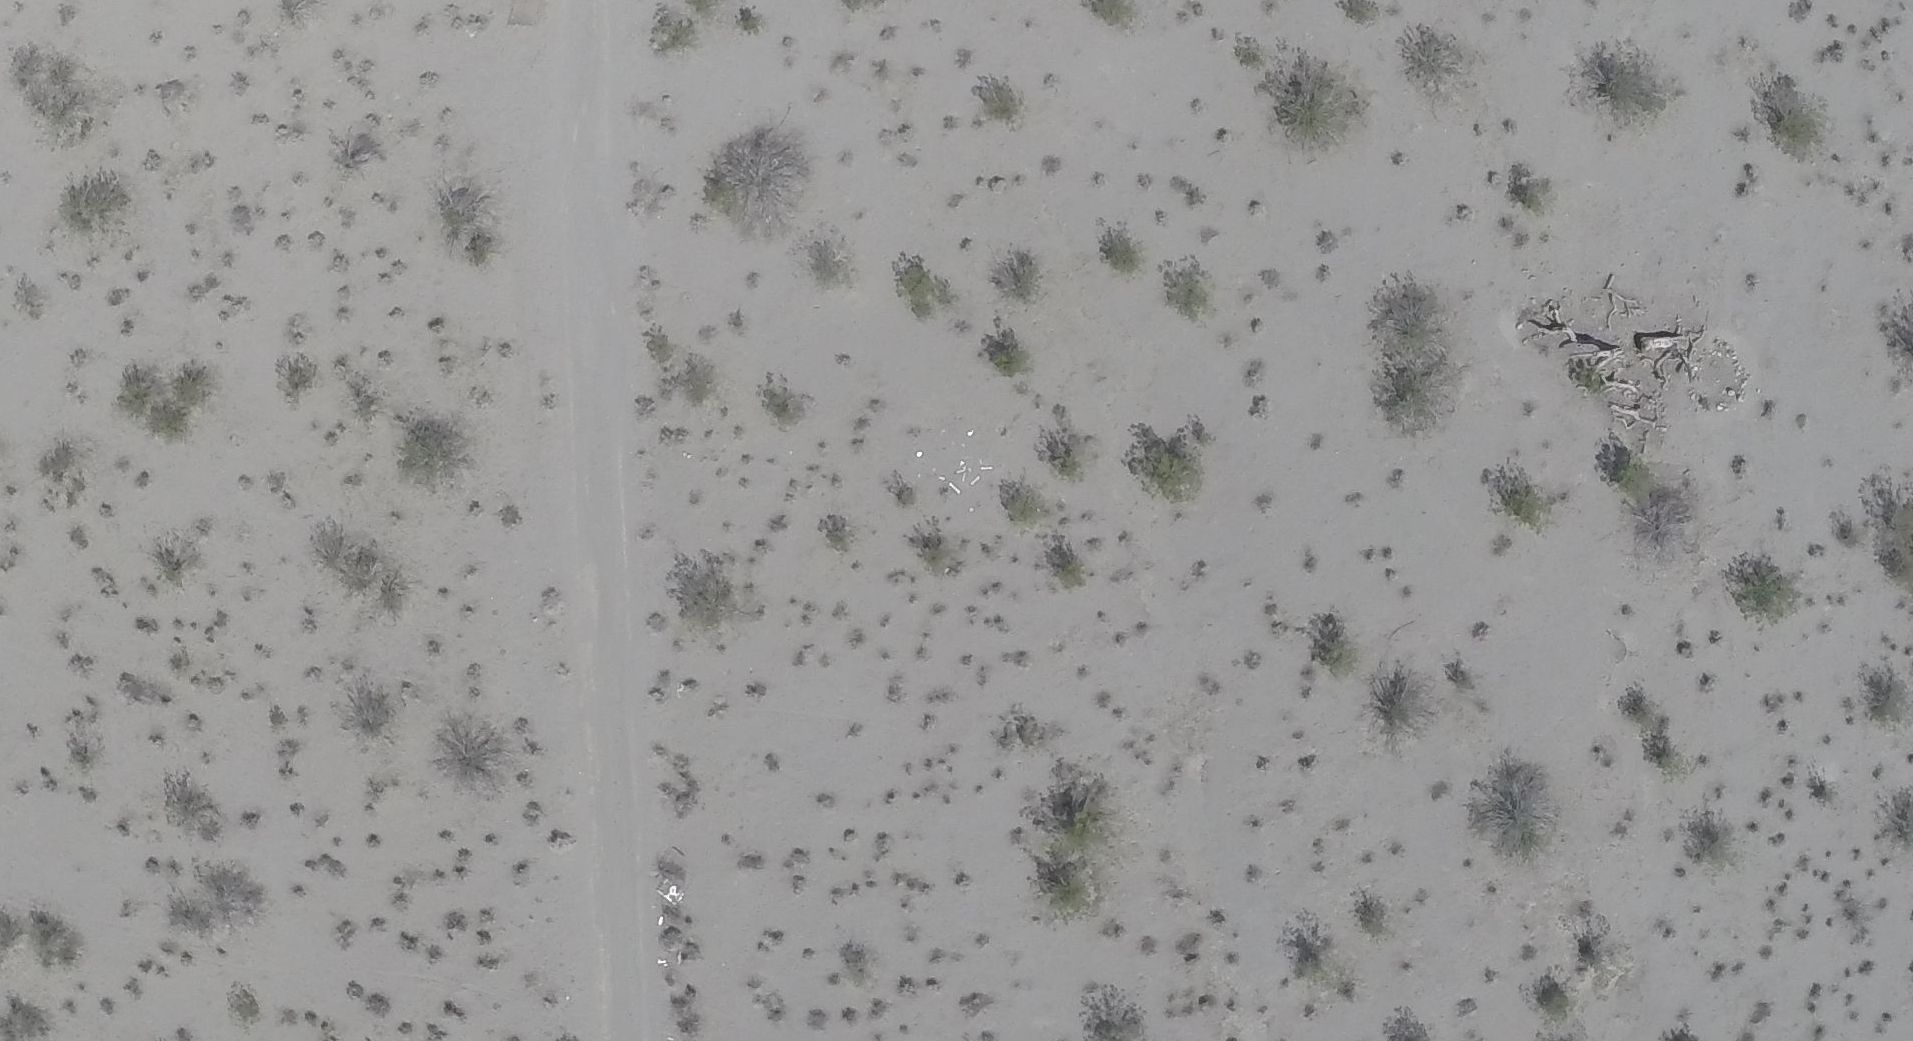
Canon SX230 HS camera overflying my bone test site at 400 feet.

Canon SX230 HS camera overflying my bone test site at 450 feet.
GoPro Hero 3+ Black Images:
GoPro Hero 3+ Black camera overflying my bone test site at 50 feet.

GoPro Hero 3+ Black camera overflying my bone test site at 100 feet.
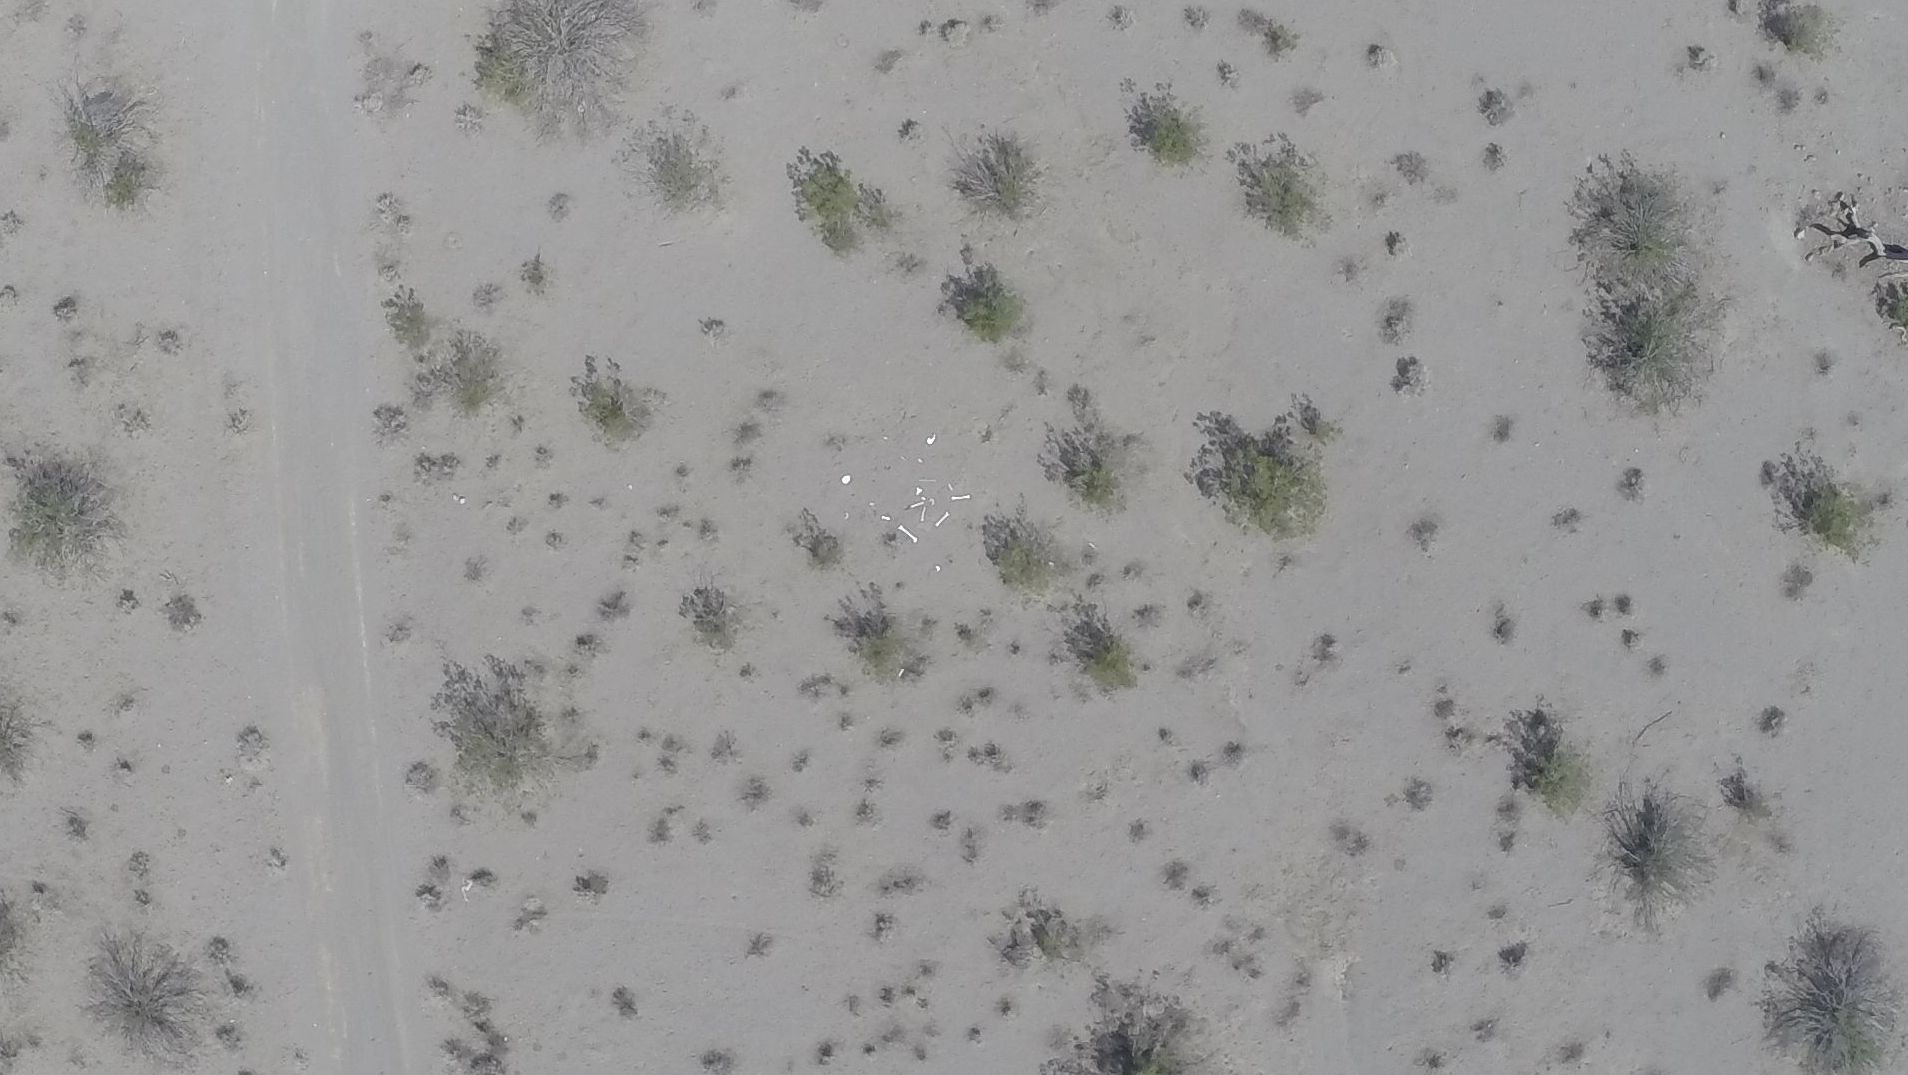
GoPro Hero 3+ Black camera overflying my bone test site at 150 feet.

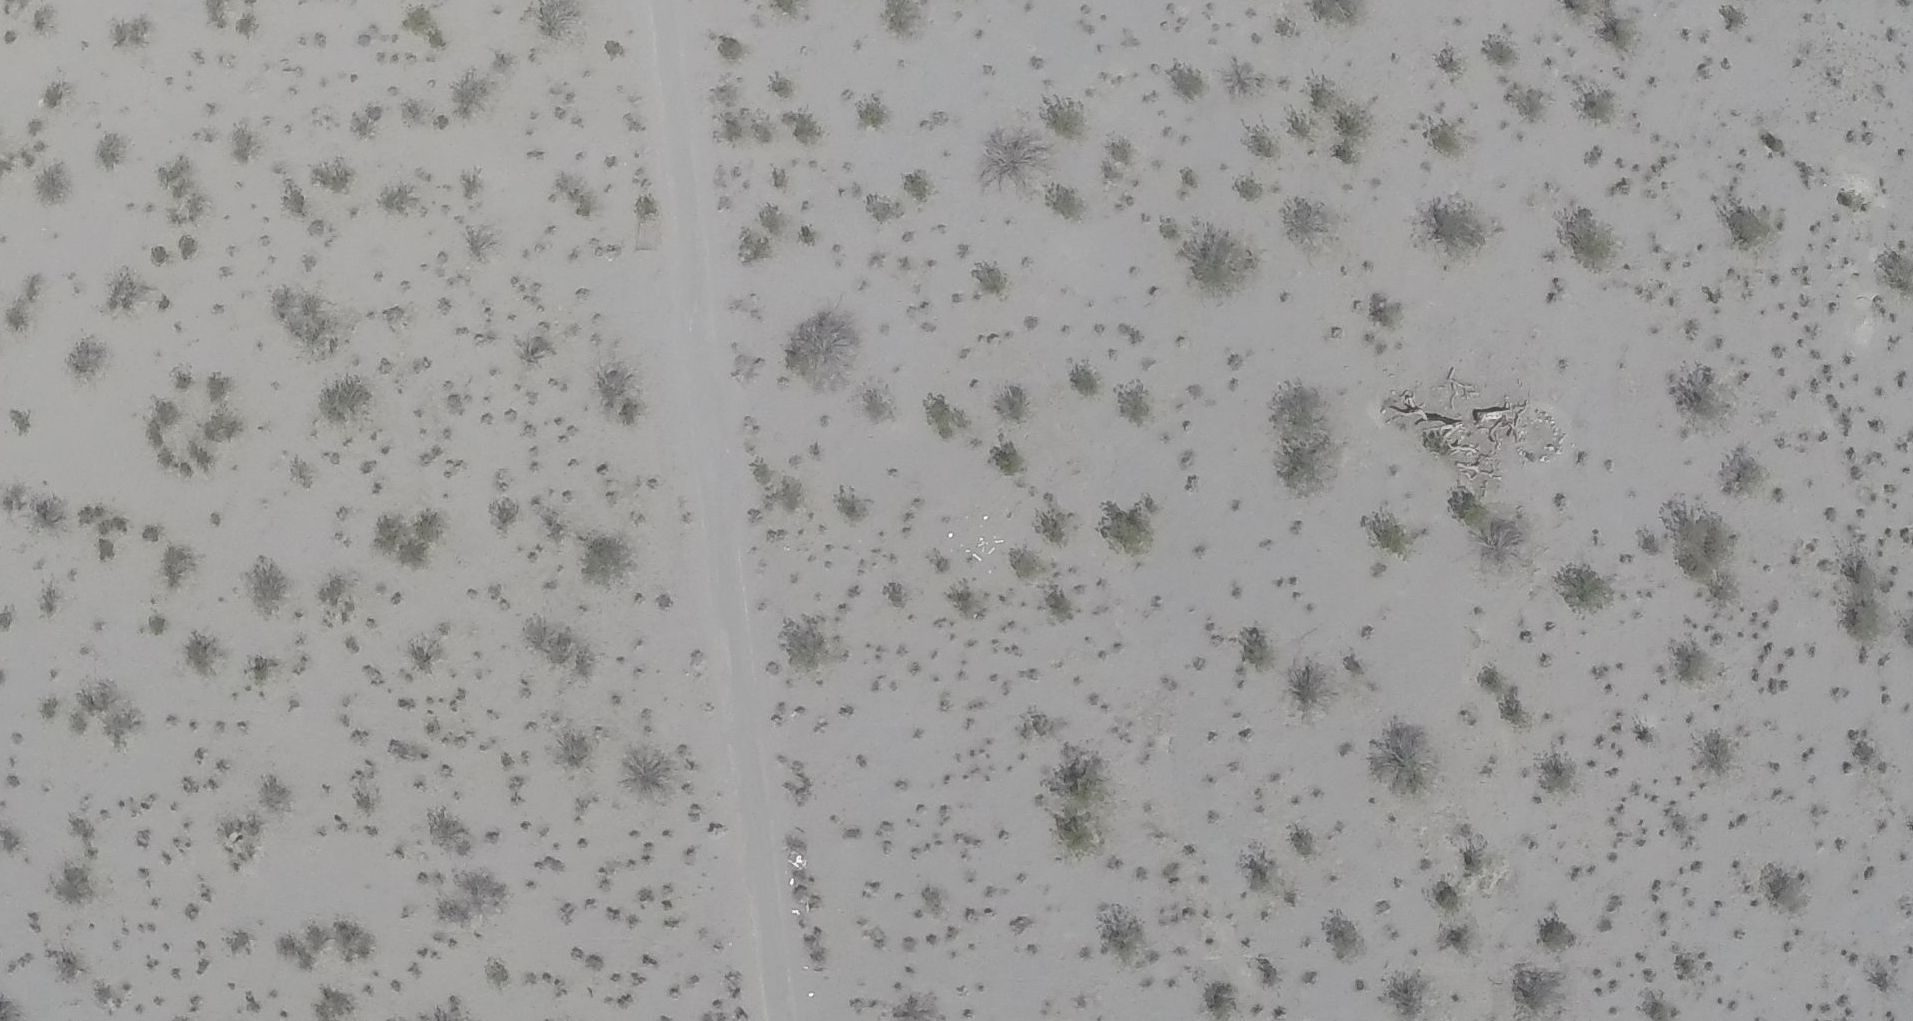
GoPro Hero 3+ Black camera overflying my bone test site at 200 feet.
GoPro Hero 3+ Black camera overflying my bone test site at 250 feet.

GoPro Hero 3+ Black camera overflying my bone test site at 300 feet.
GoPro Hero 3+ Black camera overflying my bone test site at 350 feet.
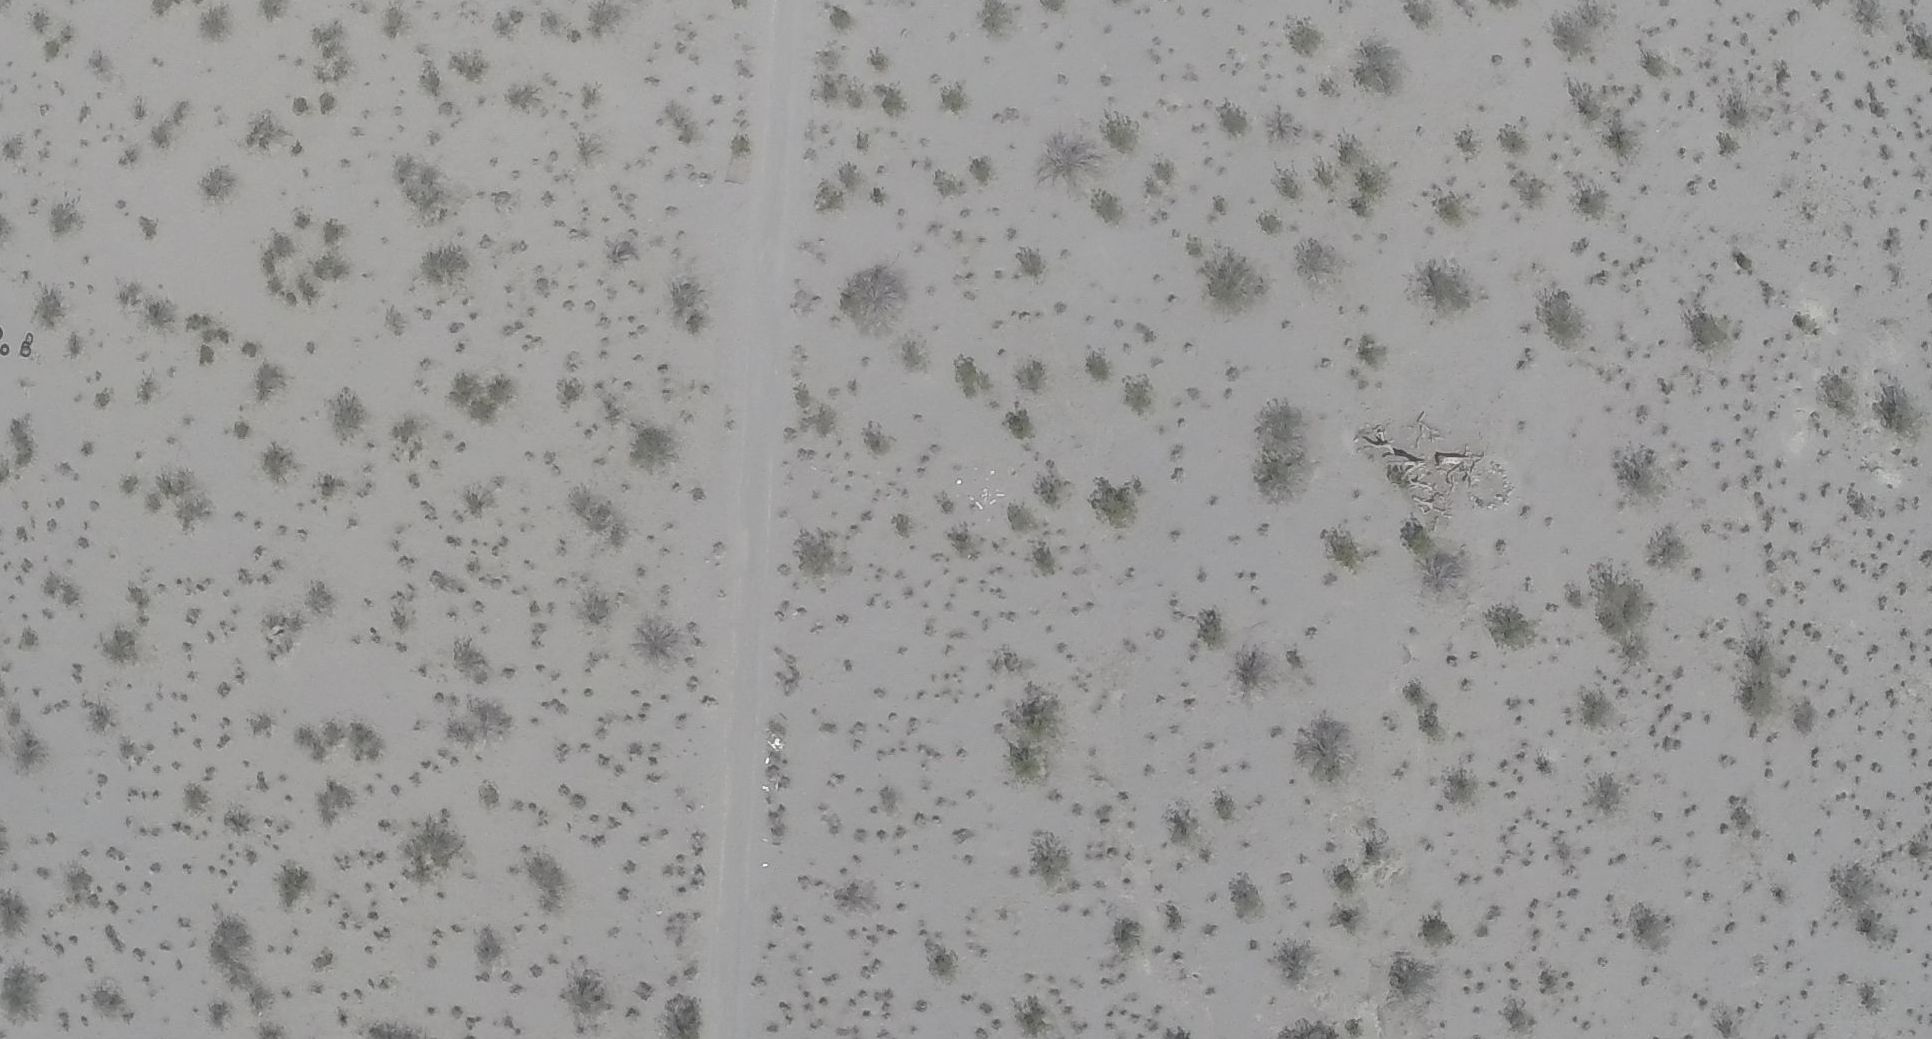
GoPro Hero 3+ Black camera overflying my bone test site at 400 feet.

GoPro Hero 3+ Black camera overflying my bone test site at 450 feet.
Full Frame Comparison of the Two Cameras:

The full frame, uncropped image taken at 400 feet by the Canon SX230 HS. The bone field is in the center. The stuff at the top of the pic is junk dumped by local lowlifes.

Full frame, uncropped image taken by GoPro Hero 3+ Black camera overflying my bone test site at 200 feet.
Conclusions
Both cameras did an adequate job of imaging my bone test field. The narrower field of view of the Canon allowed for a higher flight altitude which really wasn’t a surprise. I’d say the Canon at 400 feet is roughly equivalent to the GoPro at 200 feet. I would have expected that I’d therefore pick the Canon for this sort of thing. But I don’t think I will. I think, for me, the GoPro would be a better choice.
Comparing the full frame images for the “winning” flight altitudes shows the Canon provides a perfectly fine and useful field of view. But the GoPro just blows it away with its crazy-wide field of view. The amount of coverage on each side of the flight line is amazing and mostly useable. This results in shorter flight paths to cover the same area.
Also, the GoPro is considerably lighter than the Canon, 143 grams versus 236 grams. That’s a huge difference and results in longer flight times using the GoPro.
The GoPro is a considerably less “fiddly” and delicate camera than the Canon. The Canon, when on, extends its bellowed lens quite a bit. This downward pointing camera, just a few inches above the ground, can easily get dirt and sand blown into its mechanism from prop blast during takeoffs and landings (Learned this the hard way!). To mitigate this I must either takeoff/land on a tarp, or use the CDHK firmware to set a delayed camera start so the lens doesn’t extend until it’s in the air. The GoPro, being a sport camera, is well protected with no exposed moving parts. All the protection it really needs is a lens protector (I use a LayerLens from GetFPV).
The shortest imaging interval I can do with this particular model Canon camera is about one image every two seconds. This is a function of the camera hardware and the CDHK firmware. However the GoPro timelapse function allows for much shorter intervals, say 1.0 or even 0.5 seconds. That’s a lot more pictures but also a better guarantee that an area won’t be lost to an image made bad by temporary vibration from a gust.
Finally, in going through the two camera’s image sets there was a surprising difference in the number of blurred images. The GoPro seemed to have less images lost to vibration and just overall returned a more useable image set.
The only real negative I can think of regarding the GoPro is that it’s a lot more expensive than the Canon. While it’s possible to buy a nice used GoPro (which I did), it’s still a lot of money to risk in the air. And crap does occasionally happen (And I suspect I’m overdue).
I hope this info might prove useful to someone. As mentioned, there’s a lot of subjectivity to all this but it gives me an idea of the ballpark I’m playing in. Certainly terrain with heavy brush or trees will likely result in lower optimum flight altitudes. Another challenging environment I didn’t test for is rocky, boulder covered terrain where it’s hard to pick out non-natural items amid the clutter.