So far my experiences with the flying of drones has been the exact opposite of what I had expected. I had thunk that being a former pilot of both powered airplanes and sailplanes, learning to fly a fixed wing RC aircraft would be a piece of cake. And since I had heard stories of how hard RC helicopters were to fly (at least years ago), that multicopters would be a challenge. Shows what I know. Which is, um…..little.
Turns out multicopters, with the proper flight controller, just fly themselves. I offer up suggestions as to where I’d like them to go, but they figure out how to do it. And for me, fixed wing RC aircraft have served mainly as very large, expensive lawn darts. I’ve managed to destroy or maim an impressive variety of the standard trainer models, the most recent being my Bixler 1.1 with an APM flight controller.
I really liked the idea of using an APM to control an airplane as it works so well with multicopters. But I found installing it in the Bixler was something of a challenge, as space was limited. So I started looking around for something newer and larger to abuse. Enter the Skywalker 2013.
The Skywalker line of RC aircraft has been around for a while and is well proven and easy to fly (yeah, right). They are very popular for taking aerial photos as they have a large payload area and fly relatively slow. Their foam fuselages allow for the cutting of holes for cameras. I considered getting a Skywalker a few years ago when I was first getting into this nonsense, but its large size struck me as a considerable commitment and it looked kinda,…well….homely. But with the demise of my APM Bixler it was time to reconsider.
What I found was a new, updated version of the Skywalker called the Skywalker 2013. What set this apart from earlier versions was the presence of a carbon fiber boom between the main fuselage pod and the tail section. I also found that a number of people had been using this new version of the Skywalker for aerial imaging (and even using APMs, like at Flight Riot) and 3D Robotics was selling a ready to fly version with their newest Pixhawk flight controller. Good enough for me. I put in an order for a basic airframe and waited for the slow boat from China.
Wow, this thing was huge! And very nicely designed. The designers had set it up for the tail section to be removable. Personally I never found that to be much of a challenge as I had discovered many ways to remove my tail section. The difference was that on the Skywalker it was a “feature” and not unintended.
So I set about moving parts from the remains of my Bixler, as well as doing some upgrades. I wanted to try a longer range RC control system, so I picked up an ImmersionRC EzUHF transmitter/receiver pair. My existing Futaba RC transmitter has a range of around 2 miles at 2.4 GHz. But with the EzUHF integrated into my Futaba transmitter and the right antenna, the EzUHF allows for control of an RC aircraft on 433 MHz out to 20 miles or more. Or a lot closer, but with less problems due to obstructions. In any case, that’s pretty damn impressive. I also added a fairly high quality FPV camera in the nose to return a much better video feed than I had been used to.
One change I did make to the Skywalker was to add a set of wheeled landing gear. An ongoing problem I experienced with my other fixed wing aircraft was the launch. This involves tossing the plane into the air by hand, while at the same time trying to control it with the RC transmitter. This was much simpler when I was flying with someone else who could do the tossing, but I had about a 70% success rate on my own (’cause I’m a crap pilot). My thinking was that landing gear would serve as training wheels, allowing me to take off from the ground at my own good speed, and get comfortable with the plane’s flight characteristics. Then, should that ever occur, I could remove the landing gear (and the extra weight) and revert to hand launching. The build went well and the stinkin’ thing looked like it could fly.
For its first test I selected El Mirage Dry Lake out in the Mojave Desert, about a 90 minute drive from my home. I had visited El Mirage a number of times and it was always fun. The lake bed is about 5 miles long and over a mile wide, with a perfectly flat surface that feels as hard as concrete. With a location like this I could take off and land where I pleased. Better yet, there was nothing for me to run in to, an important consideration for a pilot of my caliber.
So very early one morning Jeri and I headed to do the first flight. It was a weekday and I think we were the only ones on the vast lake bed. Just to the south of the lake we could hear the roar of an aircraft engine from the General Atomics facility where they test Predator drones, the real deal.
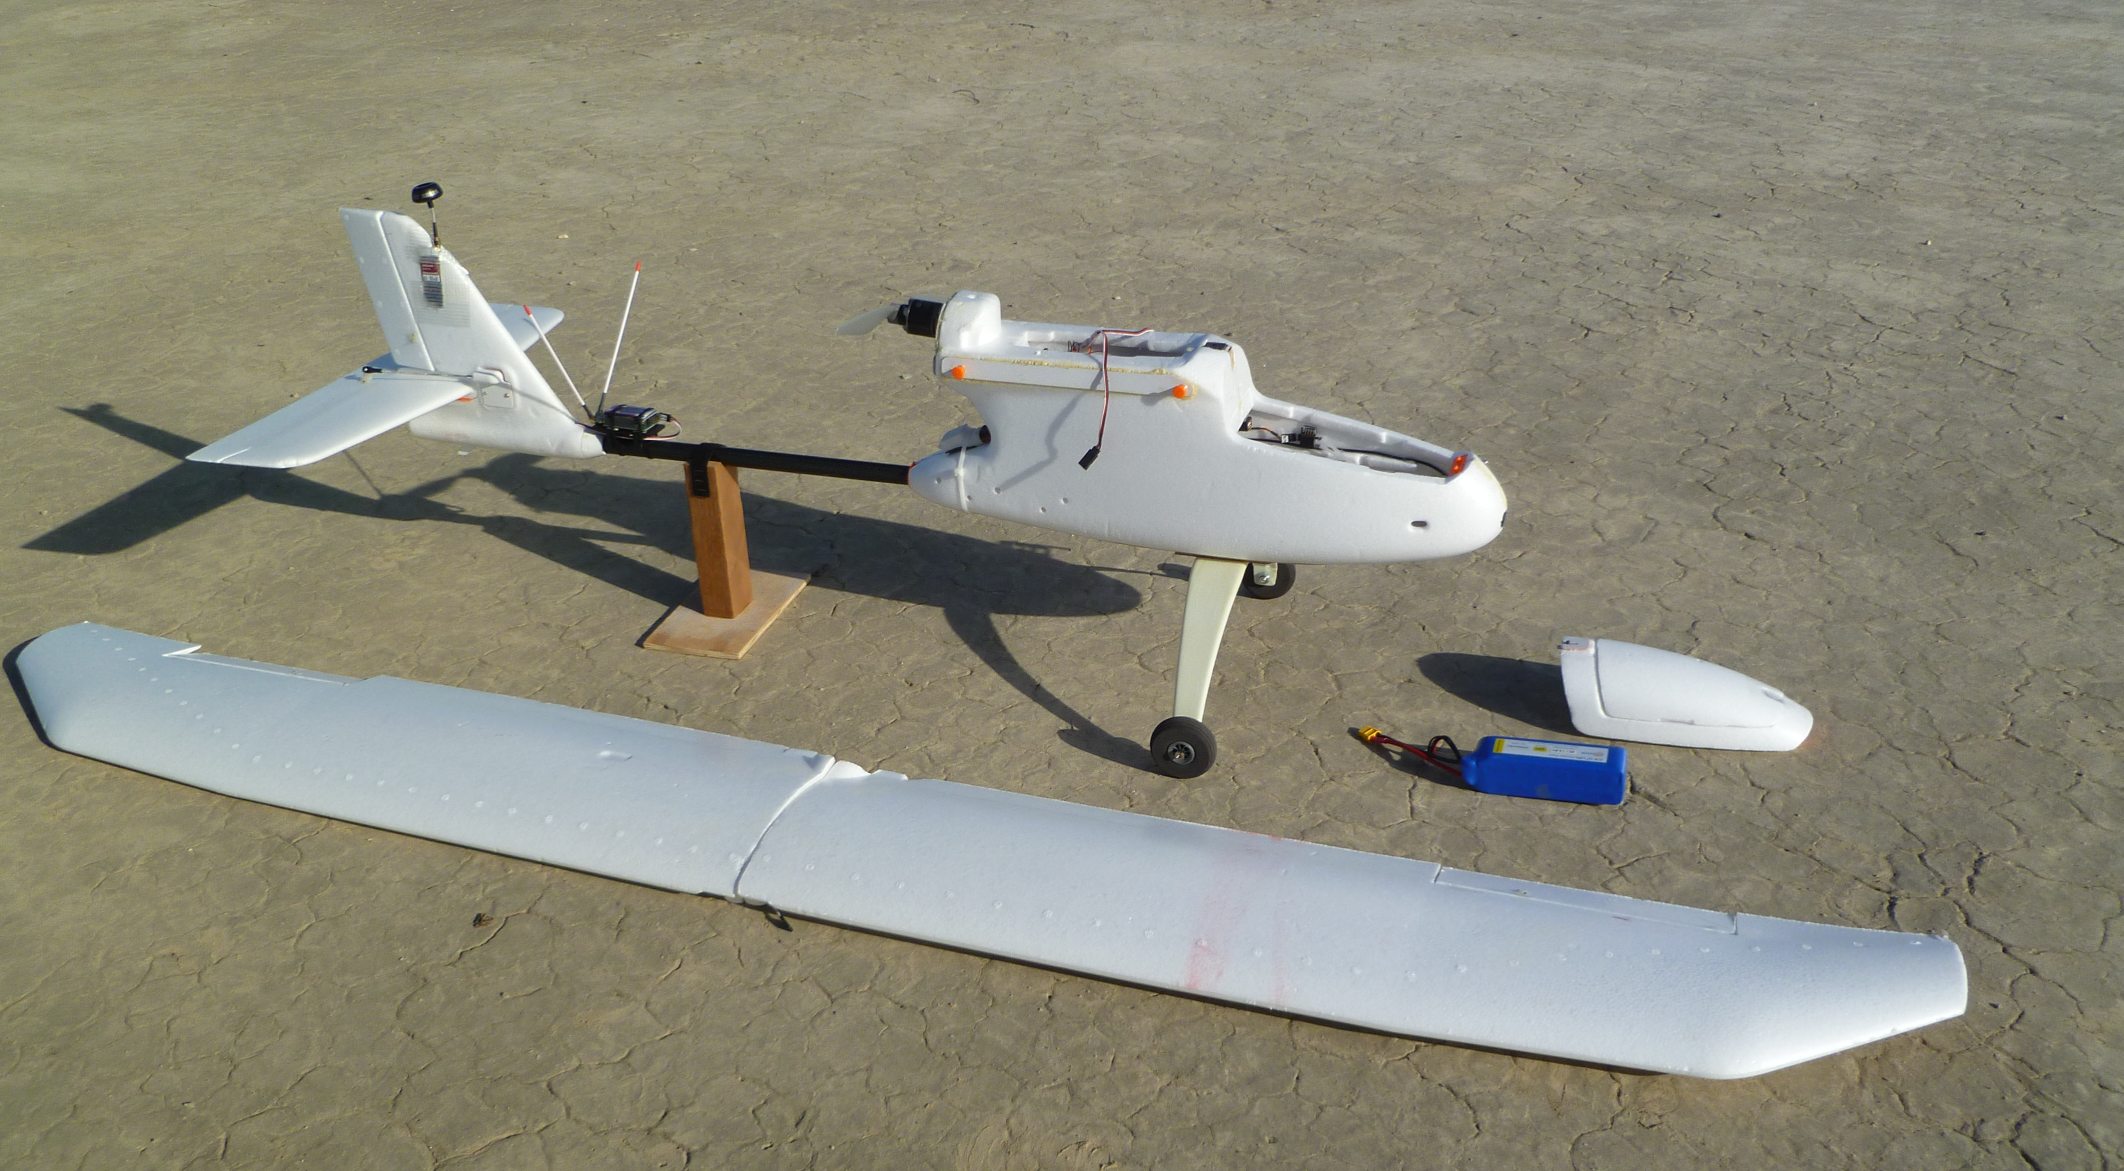
The main components of the Skywalker ready for assembly. That’s a temporary leveling stand under the tail boom.

The Skywalker’s vast payload area. To give a sense of perspective, that’s a 5000 mAh 4S battery sitting there, with room for lots more.
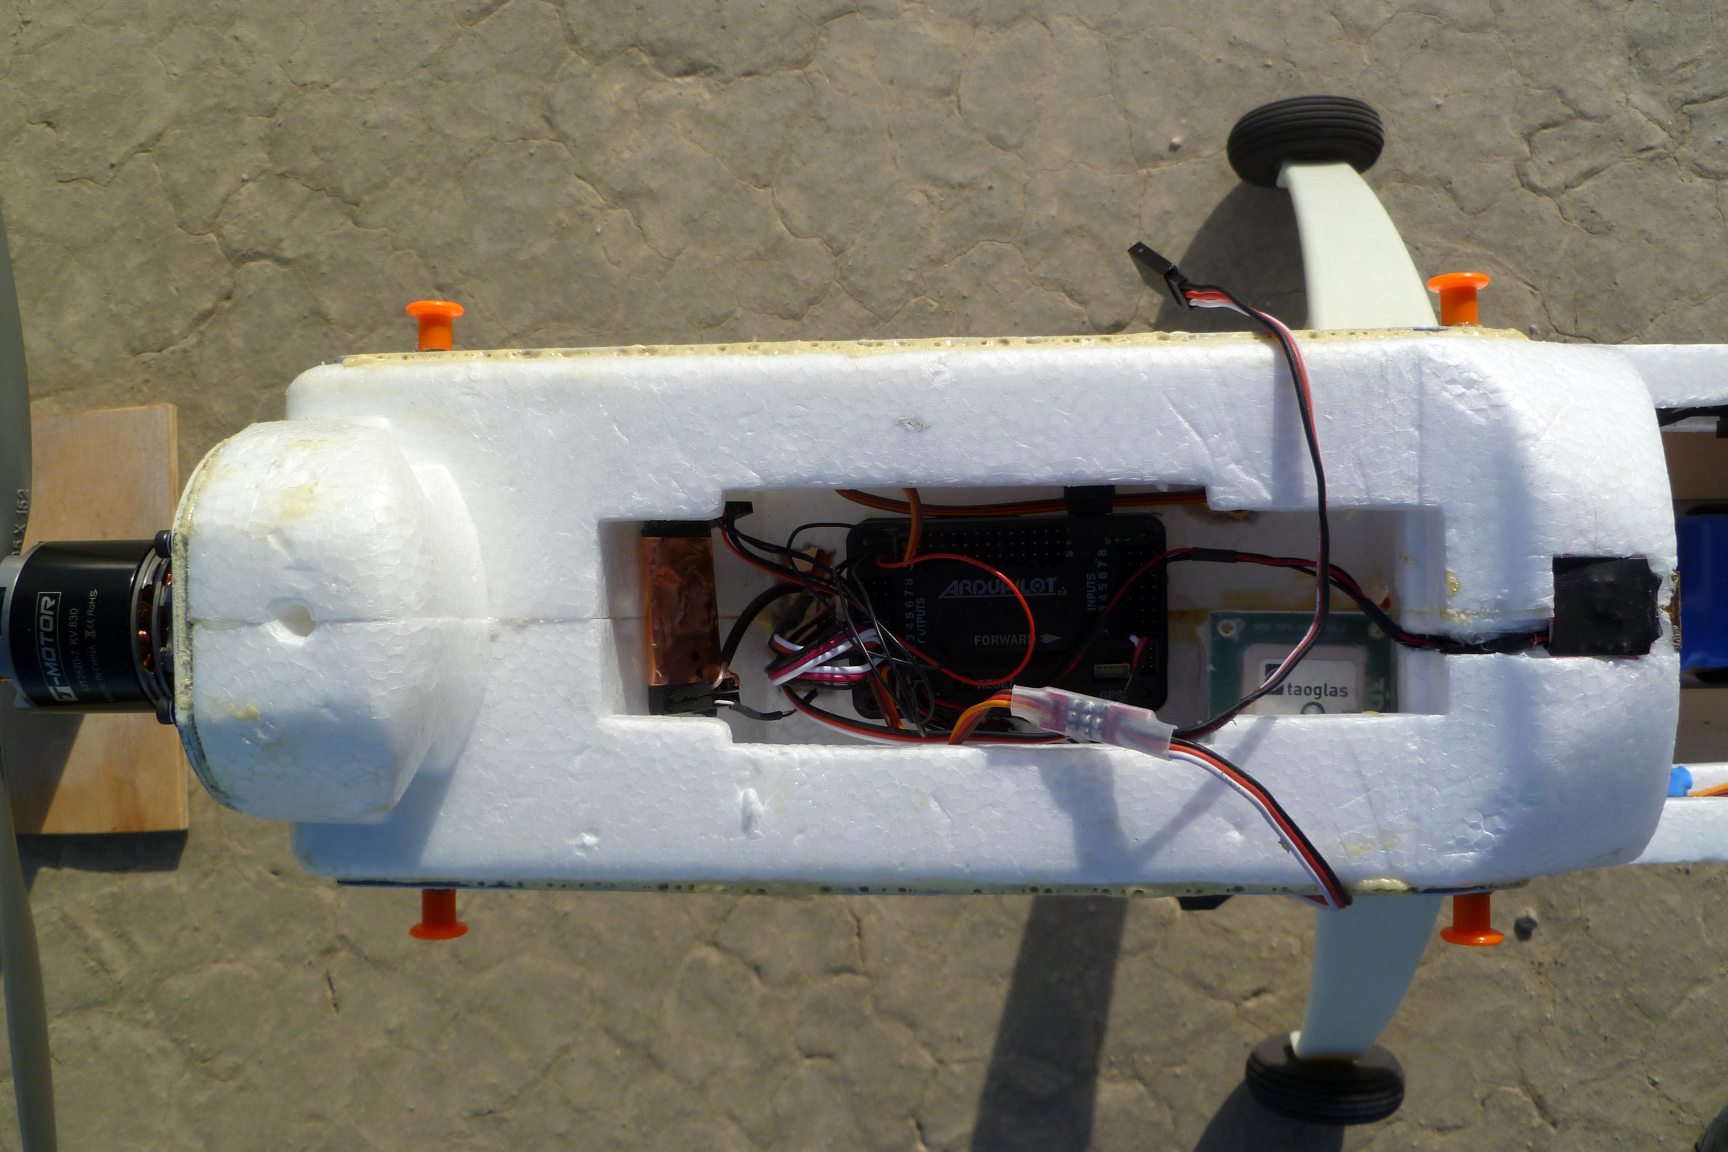
The Skywalker version has an upper compartment, just under the wing, into which all the flight control electronics fit nicely. In the center is the APM flight controller, to its left is a copper foil wrapped onscreen display, and to its right is the GPS unit. The black square on top of the fuselage at the picture’s right edge is the magnetic compass.

The rear of the aircraft showing the 5.8 GHz video transmitter I embedded into the tail with some surface area exposed for cooling. The object with the V antennas is the long range 433 MHz UHF RC receiver. At the right edge of the picture is the motor turning a 12″ propeller above the speed controller.

The assembled Skywalker placidly awaited whatever carnage I might inflict upon it. It will never look this good again.
The first flight was wonderful. I tried several different flight modes the APM offers and it controlled the Skywalker just fine. Since I was running a decent sized 12″ propeller some trim was required to balance out the prop’s torque, but beyond that it was fine. The video feed on my ground station showed me the flight data and I saw that the voltage and current data from the battery needed calibration. That meant I really didn’t know for sure the voltage level in my flight battery. So to be on the safe side I landed the Skywalker after about 20 minutes to switch to new batteries.
I had only one 4S 5,000 mAh battery which is a damn big battery. So for my next flight I was going to hook up two 3,300 mAh batteries at the same time to give me a total of 6,600 mAh of capacity allowing for longer flights. These 3,300 mAh batteries were what I typically run on my multicopters so I have lots of them. I was going to use a connector I had purchased for a couple of bucks some time ago from Hobbyking (the Harbor Freight of RC) to join the batteries.

Me in the process of setting up the ground station, Skywalker in background. It’s sort of hard to get a sense of its scale.
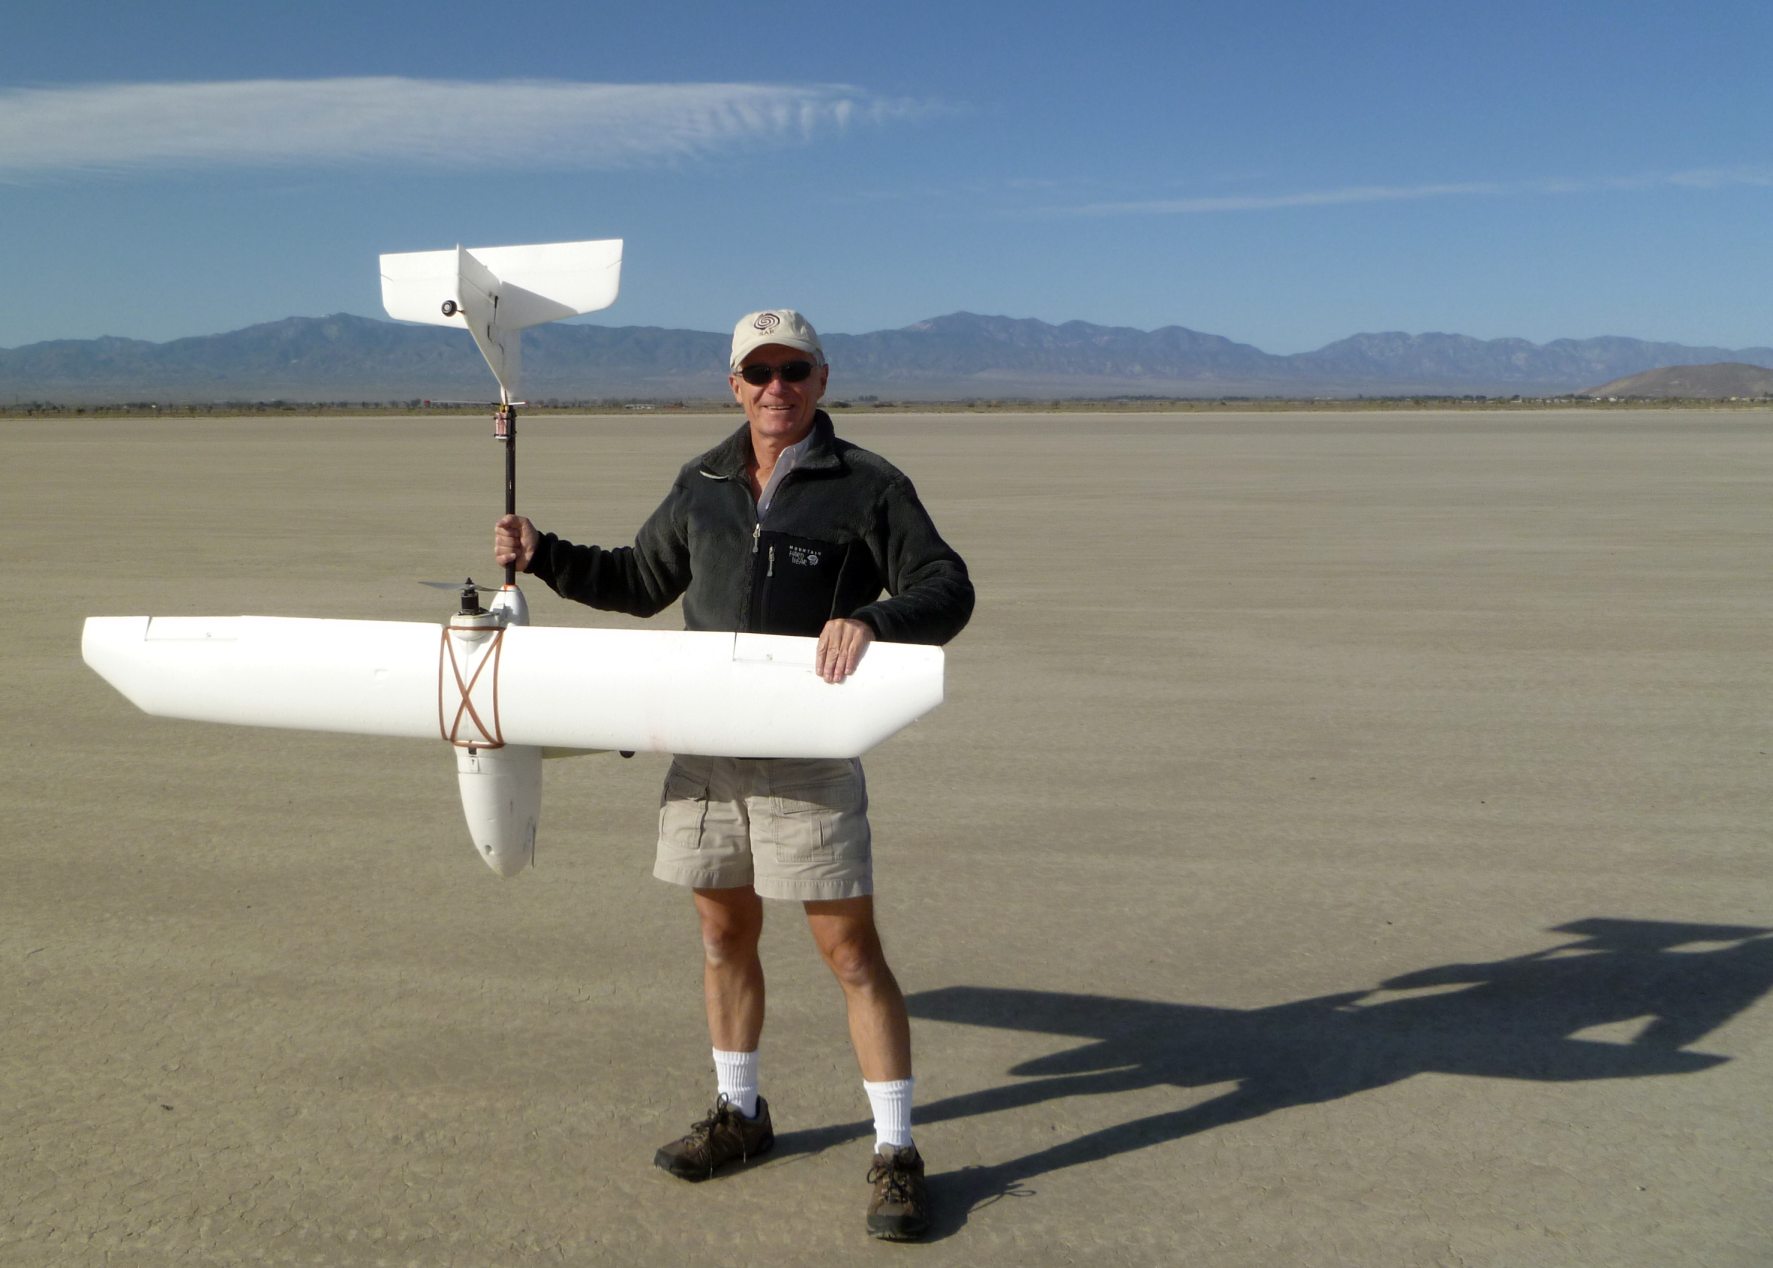
So THIS is just how big the sucker is. The buildings on the right side of the image in the background, just above the edge of the dry lake bed, are the General Atomics drone testing facilities. They seem to have better luck than I.

Hey, is this a male or female airplane? Where am I supposed to look? Actually I’m making sure the balance of the aircraft is correct. Really.
After doing a preflight and starting the DVR on my ground station, I plugged in the combined battery connection to the Skywalker. Immediately I thought I heard a “pop” and smelled something burning. As in, electronics burning. I hoped I was imagining it and stuck my nose into the Skywalker’s cockpit area. Uh oh…..Yep, that’s where the smell was coming from.
I looked at the cockpit and tried to figure out how I could have screwed up something so simple. All I did was change the battery. Did I have a short circuit somewhere? I looked closely at the connector I was using to join the two batteries studying the black and red wiring colors. Something about them didn’t make sense in my brain, then it hit me…..I’m a moron!
I thought the connector I was using was a parallel connector. That is, it combines two batteries in parallel holding their voltage constant but doubling their current capacity. But that’s not what the friggin’ thing was. It was a series connector! These hold the current capacity constant but double the voltage provided. FML! All these months I had that cheapo connector on hand and never bothered to look at it closely. I just assumed….
A 4S Lithium Polymer battery (a LiPo battery) has a nominal voltage of 16.8 volts. That’s what all the expensive electronics in the Skywalker were designed to run on. What I managed to do was to briefly hook the entire system up to double that voltage, 33.6 volts. As an engineer I’ve I have very little creativity. Except when it comes to making stupid mistakes. In that one, useless area my creativity is boundless.
So after its one flight I was done for the day.
As mentioned, there were some pricey electronics on board. This had the potential to be a rather costly mistake and I was expecting the worse. But upon conducting an autopsy, things weren’t as bad as they could have been.
The APM flight controller (a 3D Robotics model, not a cheap clone) was toast, along with its Power Module however the connected GPS seemed to survive. The onscreen display was also fried. But the video camera and transmitter were unscathed as were the EzUHF receiver and Castle Creations speed controller. Yay for ImmersionRC and Castle Creations. Apparently their stuff is built to withstand graduate-level idiocy.
Within a week I had the Skywalker’s electronics restored and ready for flight due mainly to having on hand some clone APM controllers. Prior to my first flight I had saved all the original APM’s tuning parameters on my PC so it was just a matter of loading those original parameters into the replacement APM and doing some calibrations. I also tossed out that damnable battery connector and made my own. So it was back to El Mirage on a solo trip to attempt flight number two.
For my first flight I was again using a single 5,000 mAh battery. As I took off, things began to get weird. The aircraft was porpoising badly like I was overcontrolling. At one point I pulled it up so hard the wings bent into an impressive “U” shape. Why they just didn’t snap I don’t know. It looked like they should have. After a couple of panicky minutes I realized it was in a fully manual mode where the flight controller was doing nothing at all. Me, flying all by myself is usually not a good thing. So I quickly switched into one of the assisted modes and things calmed down…..a bit. But it didn’t seem to be flying nearly as well as it had on my first flight. It felt like there was something squirrely about it. Whether the battery had got loose and moved due to the initial gyrations or I was just spooked by its unexpected behavior I don’t know. I noticed the text of the onscreen display kept cutting in and out and that the image from the camera was all off-color and deeply blue. The unreliability of the data display kept me from getting the Skywalker up high and obtaining some maneuvering room. The camera’s blue tint was some after effect of the voltage overload and I hadn’t realized it needed to have all its image setting redone. But the video feed coming from the Skywalker was worthless. This had turned into quite the opposite flight of its first one and far too much stuff was happening.
Even bad things have to come to an end. After about 8 minutes of flying it rolled into a steep bank and spiraled into the very hard ground of the lakebed. Notice how I said “it rolled” rather than I rolled it. I feel a little better describing it that way. The damage was substantial, with the battery tearing through the nose of the Skywalker, being ever so slightly cushioned by my nice expensive FPV camera. While the rudder had snapped off, the wings had only minor damages.
I may not be meant to fly fixed wing aircraft.
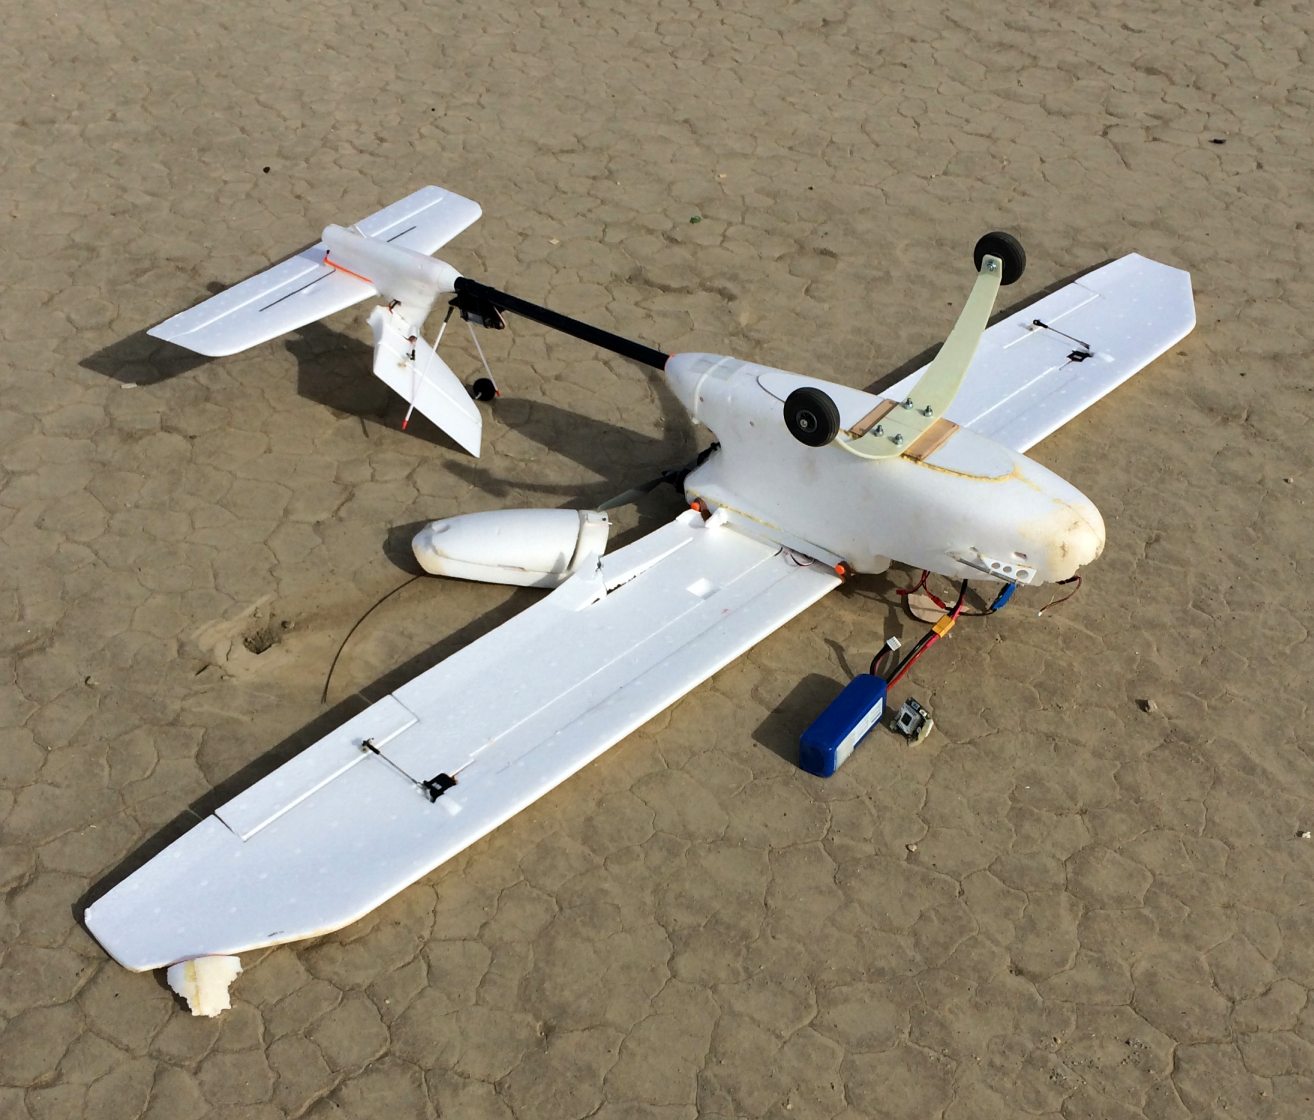
Crash number 1. The item to the right of the blue battery is the destroyed FPV camera. Perhaps a nose isn’t the best place to put these things…..at least for me.
This took about two weeks to recover from, but I took great care in the restoration. I tracked down my onscreen display problem (a missing ground wire) and ordered a new FPV camera. I was able to rebuild the nose of the Skywalker reasonably well and despite a sort of Frankenstein look, it was returned to wholeness. I also modified my RC transmitter so I wouldn’t accidently have it in a manual mode. I went over the APM’s data logs to see if I could find a reason it felt like it was flying odd, but didn’t see anything obvious. My conclusion was I tip stalled it (pilot error) by turning improperly.
So back to El Mirage with Jeri for a third flight attempt. Prior to launch I checked everything and it seemed OK. The tail section looked a little twisted from the wing but I was able to twist it back by hand to line it up. It wasn’t great that it was loose, but I should be tight enough for the flight. Up in the sky a few thousand feet above us was circling a Predator drone under test, being followed by a chase plane. That was very cool to see.
I had a nice take off and things felt much like the first flight. I had performed a reset on my RC transmitter and lost the trims I had set up on the first flight so I expected new trimming would be the first order of business. I noticed it was gradually curving to the right so I added some left trim. The right turn stopped, but now it was turning to the left in an increasingly steepening manner. I was flying in an assisted mode (I was certain this time!) and it should have been limited to a 45 degree bank. It quickly went past this and spiraled into the lakebed at almost a 90 degree bank about 600 feet away. It was about a 15 second flight.
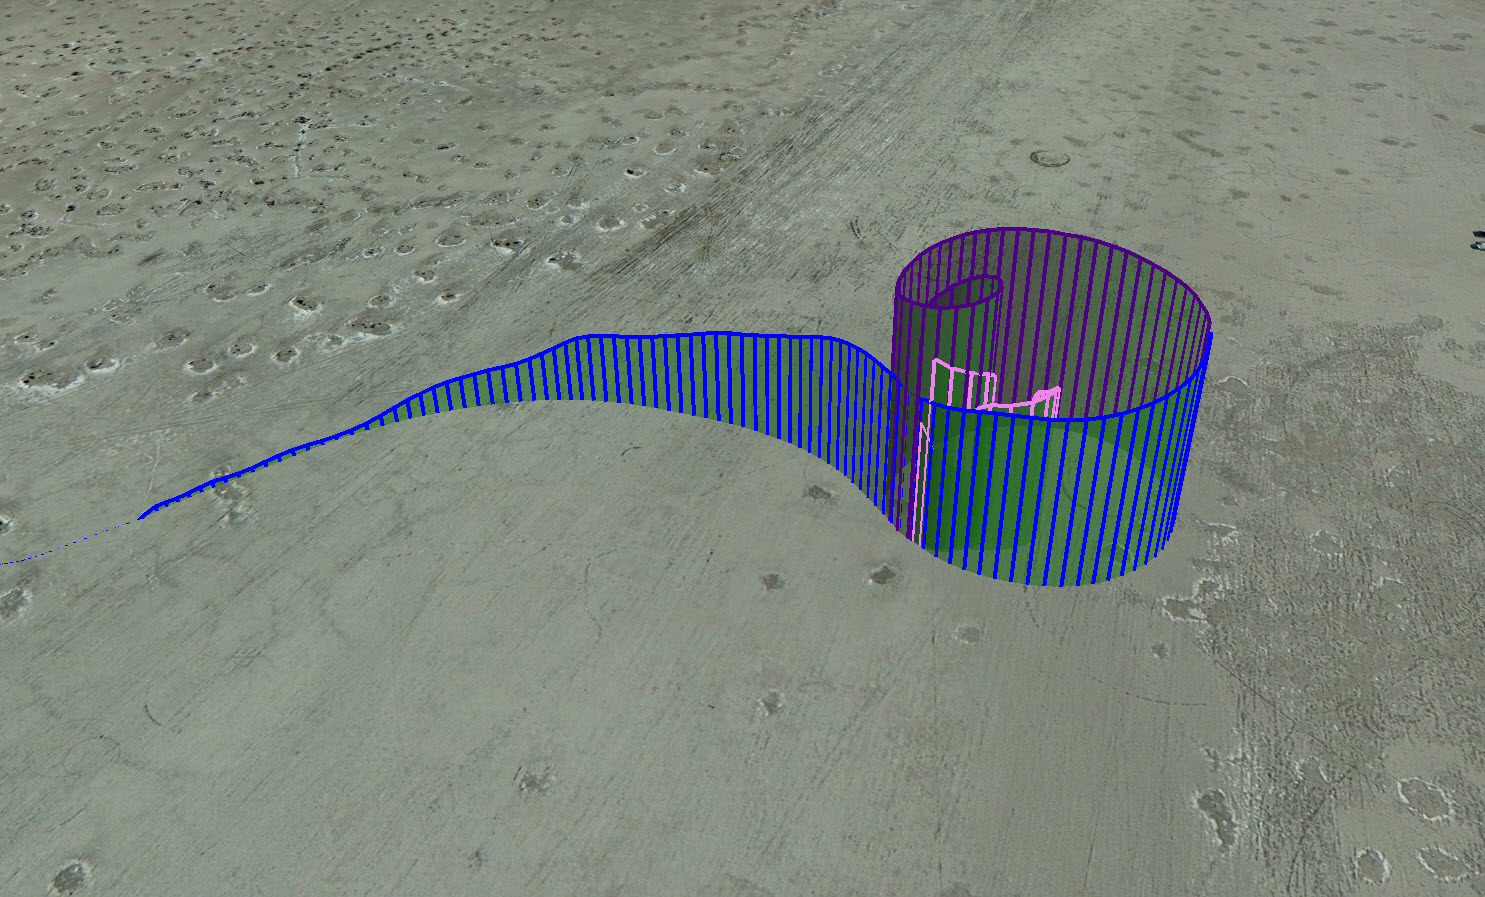
Flight profile of the boom-snapping crash in Google Earth. After a decent launch it began an increasing spiral to the left with a bank angle approaching 90 degrees.
Damage this time included the usual “battery through the nose and FPV camera” scenario, but also I saw my carbon fiber tail boom had snapped. The latter was a big deal as it was glued into place at the tail end and clamped at the fuselage. Swapping it out of the tail would be difficult to impossible.
Returning home and looking at the flight data log really didn’t clear up what happened. In fact, it showed the APM was trying to counteract the increasingly steep bank, but failed. In removing the stub of the carbon fiber boom from the fuselage I was struck by how tightly it was held in place. This didn’t match with my observations of looseness just before the flight. I then realized the boom could have had a spiral fracture I failed to notice, but felt it as the boom being “loose”. Once it started undergoing flight loads it failed completely. I don’t know if this is in fact what happened but it makes me feel better to think so. Well, a little bit better anyway.
I lucked out in regard to the broken tail boom. I found a place that sells 6″ segments of carbon fiber tubing for only $11 with an outer diameter of just a few thousandths of an inch less than the inner diameter of my broken tubing. I trimmed the broken ends, slathered epoxy along its innards and slipped the new segment in like a splice. Worked like a charm and the Skywalker is ready to fly yet again.
So, how did the new flight go? Well…there hasn’t been one yet. I’ve decided I need to really learn to fly RC fixed wing aircraft at a basic level before I mess with my battered Skywalker again. I figure it has maybe only one crash left in it. And I don’t want to even think about my Techpod.
To that end I picked up a huge Storm Chaser from Crash Test Hobby. This is truly an idiot proof trainer suitable to learn on. It’s made of EPP foam, which is far more resistant to damage than the EPO foam (think ice chest) the Skywalker and most other trainers are made of. It is indeed an ugly creature, but flies slowly and with much forgiveness. As of this writing I’ve flown it four times and have almost two hours in the air from those four flights. Before I return the Skywalker to the air I think I’ll slap an APM controller on the Storm Chaser and use it as a nearly indestructible test bed for autonomous flight.
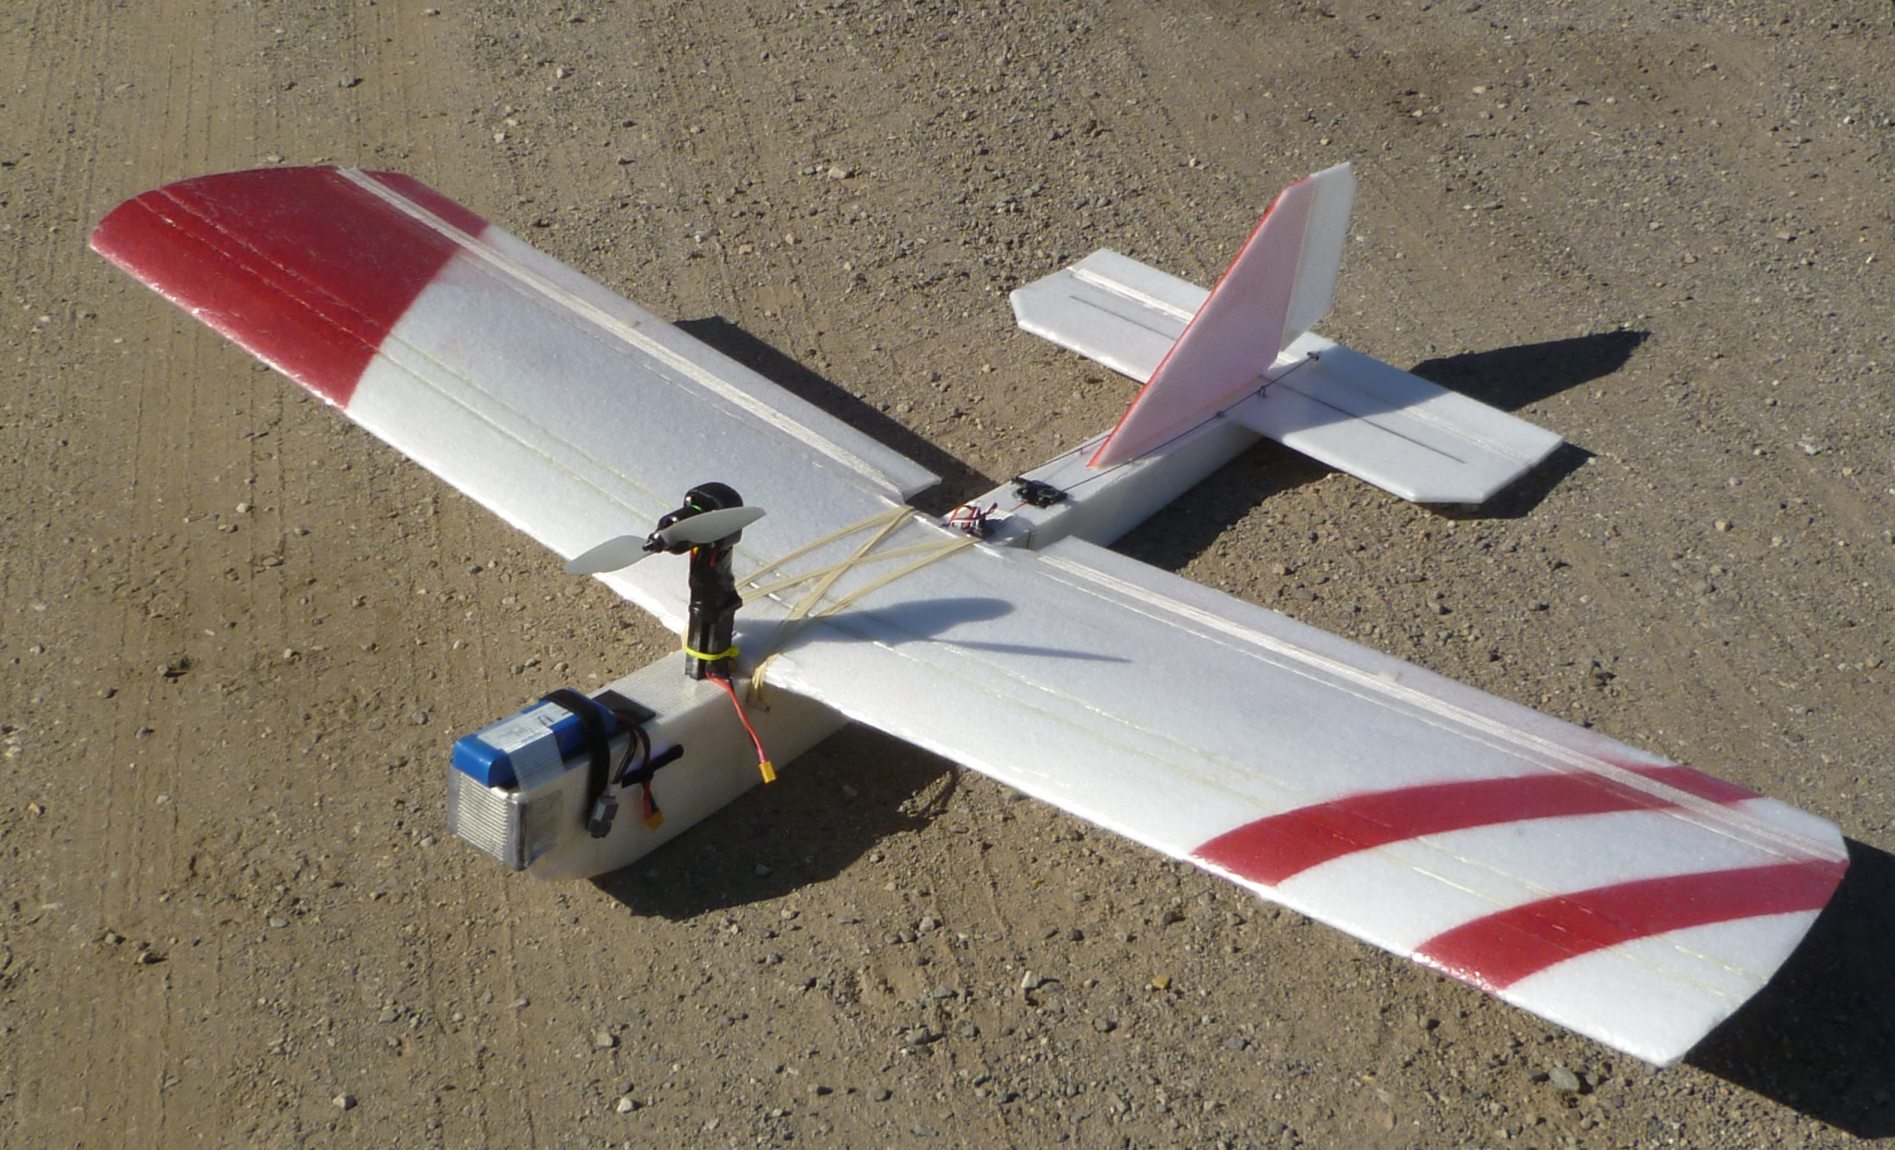
The Storm Chaser. Yeah, it’s just big ugly blocks of foam. For this early iteration I’ve just taped the battery to the nose. The motor is on a pylon which keeps the props away from the ground. This flies amazingly well.

This is how big the Storm Chaser is. It would probably fly just fine with a kitten duct-taped to the wing. But more important, it just might survive me.